
My grandchildren love to sit down and work on various arts & craft projects with me. When it comes to decorative paint, they love painting on found objects like driftwood, seashells, river rocks, etc. This project is great for children age 5 years and up. They will need a little bit of adult … [Read more...] about Kid’s Craft Project: Easy Painted Christmas Holiday Seashells
kid's crafts
Kid’s Crafts – Painted Seashells Elephant Christmas Ornament

Looking for a fun holiday project to do with the kids? Got a few seashells lying around from summer vacation? Live near the beach? You'll only need 3 clean shells to make this adorable elephant Christmas tree ornament. Young kids will need a little bit of adult assistance while older children should … [Read more...] about Kid’s Crafts – Painted Seashells Elephant Christmas Ornament
Kid’s Crafts: Seashell People Stick Puppets

We love visiting the beach and always come home with a bag full of seashells to use in our crafting projects. Just like me, my two grandchildren love working on various arts and craft projects. Just last week my granddaughter made these two adorable Seashell People Stick Puppets. She completed them … [Read more...] about Kid’s Crafts: Seashell People Stick Puppets
Kid’s STEM Project: Baking Soda Fizzy Rocks
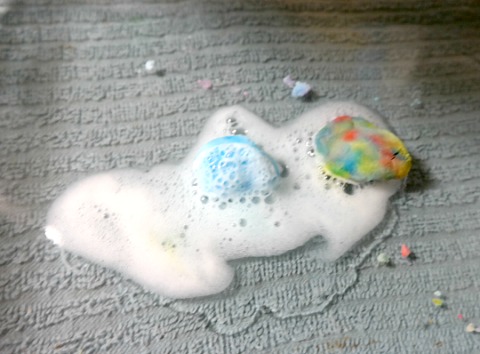
I'm homeschooling my 11 year old daughter for the entire school year and always looking for new STEM projects for her to complete. A few weeks ago we came across the Baking Soda Fizzy Rocks project which she really enjoyed. This project is best for children ages 8 and up with adult supervision. It … [Read more...] about Kid’s STEM Project: Baking Soda Fizzy Rocks
Kid’s Crafts: Hand Painted Jellyfish Design on Seashells

Painting simple designs on seashells is so much fun! Your designs can be animals, wordage, flowers, fruits & veggies, cars, etc. Whatever your heart desires! Matter of fact, you'll find over 100+ seashell craft projects on the TwoClassyChics blog. We love this crafting medium because it doesn't … [Read more...] about Kid’s Crafts: Hand Painted Jellyfish Design on Seashells
Easy Handmade Happy Birthday Greeting Card Ideas

I'm one of those people who despises virtual greeting cards. I don't like sending them and I sure don't like receiving them. They're impersonal and boring. While they're quick to send and often times free...I dislike them with a passion. * This post contains affiliate links. Over the years … [Read more...] about Easy Handmade Happy Birthday Greeting Card Ideas
Hand-Painted Cupcake with Sprinkles Seashell Refrigerator Magnets

These hand-painted cupcakes with sprinkles seashell refrigerator magnets are really easy to make. All you need are a few scallop seashells, painting supplies and magnets. You can whip up an entire bakery of them in no time at all. They would be cute used as party favors at a little girl's birthday … [Read more...] about Hand-Painted Cupcake with Sprinkles Seashell Refrigerator Magnets
Kid’s Crafts Hand-Painted Black Cat Seashells

Cats are beloved by millions of people around the world. While dogs may be man's best friend...cats are certainly running a close second. Last year we rescued and adopted 2 cats which my grandchildren instantly fell in-love with. Sadly...we lost Tucker last October to a severe illness but we still … [Read more...] about Kid’s Crafts Hand-Painted Black Cat Seashells