Tag: Count Down to Christmas

Hand Painted The Grinch Crab Shell Christmas Tree Ornaments

Hand Painted The Grinch Crab Shell Christmas Tree Ornaments

Over the years I’ve posted dozens of hand-painted seashell designs on the Two Classy Chics blog. For the most part I like to paint on large clam shells or oyster shells. However, last month I did something different. I painted The Grinch on a crab 

Quick and Easy Wood Balls Snowman Christmas Ornament

Quick and Easy Wood Balls Snowman Christmas Ornament

These snowman Christmas ornaments are super easy to make! You can make at least a dozen of them in just one weekend! Once completed they can be used as ornaments, package tie-ons, hung from a peg hook, etc. A great craft project for older kids 

Painted Wood Snowman Christmas Ornaments

Painted Wood Snowman Christmas Ornaments

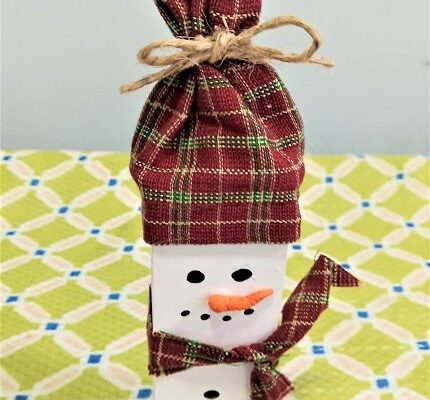
Painted Wood Snowman Christmas OrnamentsThese handcrafted and hand-painted Snowman Christmas tree ornaments are made out of scrap pieces of pine wood. If you don’t have a saw or a scrap wood pile…you could use wood Tumbling Blocks (game blocks from Dollar Tree) or Jenga-style wooden blocks. Size doesn’t have to be exact, just slender rectangular in shape.

My husband cut me blocks from his scrap wood with each block measuring approximately 1 1/4″ to 1 1/2″ wide, by about 4″ tall by 3/4″ in depth. Like I said, measurements don’t need to be exact. Use fine sand paper and give them a little buffing to make sure that the edges are smooth. You can skip that step if you’re using pre-purchased Tumbling Blocks from Dollar Tree (kid’s game section in the store). You can purchase them from Amazon for a great price too!

I made 15 of these ornaments as I’m going to be attaching them to Christmas gift boxes and bags as an additional gift for the recipient. So, I set up an assembly line making them. I laid out all of the blocks and painted them with 2 coats of white acrylic craft paint on all sides. If you want to save time you can certainly use white spray paint.  Let them dry until the paint is no longer tacky.

Measure around the top of the snowman’s head with a tape measure. Add 1″ to the circumference. That number will be the width that you need for your fabric swatch by 4″ tall. Cut the rectangles out of cotton fabric. I used homespun fabric which I picked up at the craft store by purchasing fat quarters in the quilting section.

To save time I used a hot glue gun instead of sewing them. Fold the circumference edge under by a 1/4″ of an inche and tack down with hot glue. Then glue that edge around the top of the block, overlapping in the back. Use hot glue to adhere the to back seams together with the raw edges underneath and hidden. At the top of the hot fold under by 1/4″ and tack down with hot glue so that no raw edges of fabric are showing.

Cut a piece of 1/8″ wide ribbon or hanging string 4″ long and knot the two ends together. Put a squirt of hot glue down into the top of the hat and use a pencil to shove the knotted end down into the glue so it’s hidden out of sight. You can use twine, satin ribbon, cotton fabric, etc. to make a bow around the upper 1/3 of the hat as shown in the photograph. Tack it down with a tiny glob of glue. Let it set before moving on.

For the facial features. I dipped the end of a paint brush into black acrylic craft paint and dotted on 2 eyes and 4 smaller dots for the mouth. You can use orange craft paint to make a carrot shaped nose or…make one out of air-dry modeling clay which is what I used. I like the dimension that it gives to his face. If you’re using modeling clay…make the carrot shaped noses from orange clay a few days before you make the ornaments. The clay needs time to harden-up before you use them. Use a tiny dab of hot glue to adhere the carrot nose to his face.

Finishing up – I tied a matching or coordinating homespun fabric scarf around their necks. Just tie it around and knot the ends together leaving a little “tail” length. Trim with scissors.  To add interest to the painted-on buttons…they vary. Some of the snowmen have 2, 3 or 4 painted on round buttons. Others have square or heart-shaped ones. You could also glue on tiny black seed beads if you prefer. You have a lot of options!

Additional Tips: Don’t use heavy wood that can weigh down tree branches too much. Stick to lighter-weight woods and keep the size of the blocks manageable. Regular craft glue takes too long to dry, use a hot glue gun to speed things up. If you want to protect the painted finish you can spray them once painted (and dry) with 1-2 light coats of clear acrylic sealer before adding their embellishments. If you plan on making a lot of them…I do recommend setting up an assembly line. I made the clay noses one day, several days later I painted all of the blocks white and then a few days after that I decorated them.

* This post contains affiliate links. If you make a purchase, we may or may not receive a small commission which helps to support this site. Thank you!

Shelly's Signature

Easy-to-Make Mussel Shells Snowman Christmas Ornaments

Easy-to-Make Mussel Shells Snowman Christmas Ornaments

These adorable snowman Christmas tree ornaments are easy-to-make! You don’t have to be a professional artist or crafter to make them. They’re made using clean Mussel Shells – Seashells. You’ll need just a few basic supplies and you can make several of them in one 

Painted Snowman Ornaments Made with Tumbling Tower Blocks

Painted Snowman Ornaments Made with Tumbling Tower Blocks

It’s never too early to start your Christmas holiday crafting. Besides, these little painted Snowman ornaments can be used to decorate for the entire winter season. Nothing about them screams Christmas! Each ornament is made by gluing and painting Tumbling Tower blocks. ** This post 

How to Make a Coastal Beach Christmas Tree Collar

How to Make a Coastal Beach Christmas Tree Collar

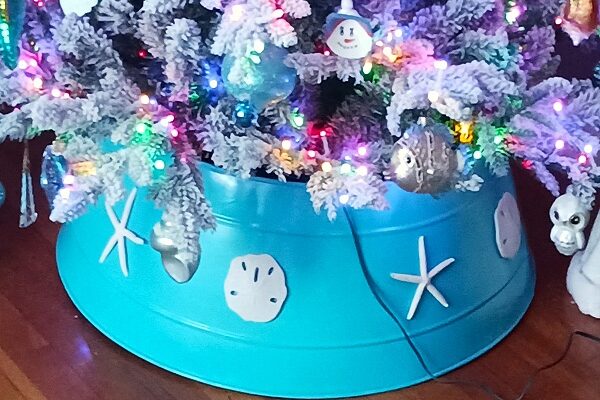
How to Make a Coastal Beach Christmas Tree CollarDuring the holiday season I look forward to getting our Christmas Tree put up and decorated in a Coastal Beach Style. The Christmas Tree stands 7 foot tall with a frosted snow appearance. It has a remote control with oodles of different color and white light functions. It wasn’t cheap but it certainly was a wonderful investment in our holiday decor.

** Post Contains Affiliate Links **

Anyway, last year when Christmas was over I hit up the bargain clearance sales to look for a tree collar. As expected, they were very picked over and NONE were done in a Coastal Beach style. NONE. I decided that I would have to make my own so I purchased a solid black metal Christmas Tree Collar on clearance for $10.00 and packed it away for this year. I knew it had a lot of potential to become what I needed it to be!

How to Make a Coastal Beach Christmas Tree Collar

Two weeks ago I got it out of the attic to work on it. The first thing that I did was spray paint it with 2 cans of paint in a seaglass color. This color matches the theme I’ve got going on in the family room plus will go with all of our coastal Christmas decorations. When spray painting…make sure you do it outdoors with proper ventilation. I gave it 2 coats so that I could completely cover up the black.

Now it was time to decorate it. I purchased resin sand dollars from Amazon and real white starfish. I used 4 sand dollars and 4 starfish. Get out the hot glue gun and attach them to the Tree Collar evenly spacing them out as you go around. Let the glue dry and cure overnight.

Extra Tip – If you’re going to be storing it in a hot attic (during the summertime) I recommend that you attach them using Gorilla Glue. Hot Glue softens up with high heat and your seashells will fall off.

I think our new Coastal Beach Christmas Tree Collar turned out beautifully! For less than $20.00 I got exactly the look I was going for. You can always pick up a solid color Christmas Tree Collar…paint it and decorate it to go with any style of decor that you may have in your home. I suggest hitting up those clearance sales once the holiday is over for the best bang for your buck.

* This post contains affiliate links. If you make a purchase, we may or may not receive a small commission which helps to support this site. Thank you!

Shelly's Signature

Outdoor Faux Christmas Lights Decoration DIY Craft Project

Outdoor Faux Christmas Lights Decoration DIY Craft Project

It’s time to start our Christmas and holiday craft projects. Yeah, I know I’m a little early but this next project will take you several weeks to make but don’t let that turn you off! These outdoor faux Christmas Lights were made by using foam 

Oyster Shell Seashell Gnome Christmas Ornaments

Oyster Shell Seashell Gnome Christmas Ornaments

Gnomes are cute and adorable. On top of that…they’re one of the hottest decorating crazes. You’ll find gnomes on linens, pillows, beach towels, figurines, garden decor, clothing, and yes…a big theme with Christmas decorating. These adorable gnome Christmas Tree ornaments are super easy-to-make and only