
In honor of the first official day of Spring we have a great Kid's craft project to share with you today. This project will cost less than $1.00 to make. It's made with basic craft supplies and they can be decorated any way that the child likes. Keep them simple (as shown) or let them get … [Read more...] about Craft Stick Spring Bird House Refrigerator Magnet for Kids
kid's crafts
Dollar Tree Tumbling Tower Blocks Easter Bunny Refrigerator Magnet

These Easter Bunny refrigerator magnets are made with almost all supplies purchased at the Dollar Tree. The one shown in my photograph was made by my 13 year old granddaughter who did a great job! You can make several of them in one weekend. Below you'll find a list of supplies and the … [Read more...] about Dollar Tree Tumbling Tower Blocks Easter Bunny Refrigerator Magnet
Organize Kid’s Nerf Toys with Plastic Laundry Pod Containers

My 7 year old son has a ton of Nerf guns, footballs, and other toys. The Nerf guns shoot foam bullets or darts. Those pieces get all over my house and backyard. He's always losing them and I'm always the one finding them and picking them up. Well, problem solved! Get those Nerf toys organized and … [Read more...] about Organize Kid’s Nerf Toys with Plastic Laundry Pod Containers
Dryer Lint Catch-All Made from Plastic Milk Jug

Last weekend I was complaining to my teenage daughter about all of the dryer lint being left on the laundry shelf, the floor, and other areas throughout my laundry room. I get really tired of going in there with a bag and cleaning up all of the dryer lint! Sadly, a few members in my family are too … [Read more...] about Dryer Lint Catch-All Made from Plastic Milk Jug
Upcycled Valentine’s Day Candy Boxes Window Decorations
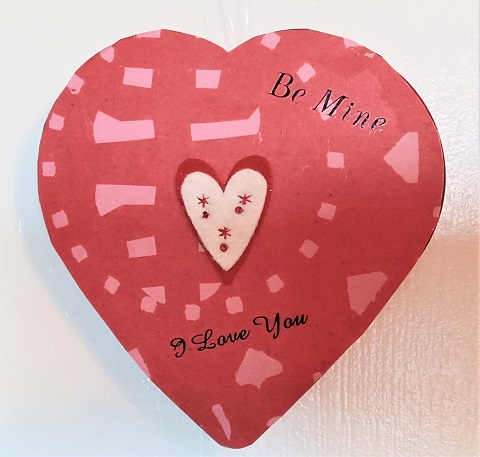
Every year my grandchildren save their Valentine's Day Candy Boxes to turn into new craft projects the following year. Many of those boxes are too cute to throw away and others can be redecorated into something you like. The kids like to decorate the windows in the living room and the front door … [Read more...] about Upcycled Valentine’s Day Candy Boxes Window Decorations
Ladybug Felt Refrigerator Magnets Kid’s Craft Project
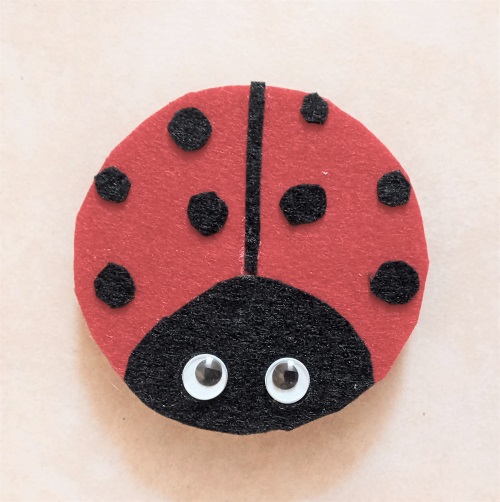
These Ladybug refrigerator magnets are made out of upcycled potato chip canister plastic lids, felt, wiggle eyes, glue and a heavy-duty magnet. They're an easy project for kids to do. You can whip up several of them in just an hour...and they don't cost a lot of money to make! * This post … [Read more...] about Ladybug Felt Refrigerator Magnets Kid’s Craft Project
Valentine’s Day Painted Cinnamon Applesauce Dough Refrigerator Magnets
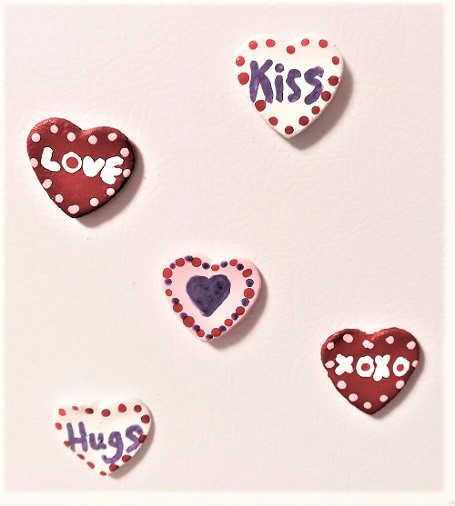
These Valentine's Day painted Cinnamon Applesauce Dough Refrigerator Magnets are adorable. A great weekend craft project to do with the kids. You can make the cut-outs in any shape or size that you would like. We used mini metal cookie cutters in a heart shape that are about 1 1/2" in size. We then … [Read more...] about Valentine’s Day Painted Cinnamon Applesauce Dough Refrigerator Magnets
Bumble Bee Felt Refrigerator Magnets Kid’s Craft Project

These Bumble Bee refrigerator magnets are made out of upcycled potato chip canister plastic lids, felt, wiggle eyes, glue and a heavy-duty magnet. They're an easy project for kids to do. You can whip up several of them in just an hour...and they don't cost a lot of money to make! * This post … [Read more...] about Bumble Bee Felt Refrigerator Magnets Kid’s Craft Project