
Thanksgiving is less than a week away, but you still have time to whip up some quick and easy Thanksgiving Day crafts. Today's Crafting with Kid's Feature let's children get creative with self-inking stamps, markers, glue and glitter! These festive Glittered Pumpkins would look super cute sitting on … [Read more...] about Kid’s Craft Project: Glittered Pumpkins for Thanksgiving
kid's crafts
Kid’s Crafts: Toilet Paper Tube Snowman Ornaments

Last weekend I had my little 7 1/2 year old granddaughter over for a play date & craft date with Nanny. Twice a month we like to get together and sit down to craft. I'm pretty lucky as a crafter, that the Princess enjoys crafting too. It's always a lot of fun and we make an entire day of … [Read more...] about Kid’s Crafts: Toilet Paper Tube Snowman Ornaments
Kid’s Craft Project: Snowman Snowball Christmas Ornaments

The holidays are coming and the Princess and I love to sit down together and whip up some quick & easy crafts. Matter of fact, I get together with my granddaughter at least twice a month, just for an arts and craft date! During the holiday season, we really "ramp up" our craft time and get … [Read more...] about Kid’s Craft Project: Snowman Snowball Christmas Ornaments
Get Creative with the Disney Princess Palace Pets Art Studio Kit

My 7 1/2 year old granddaughter is really into arts & crafts. I started holding bi-monthly arts & crafts dates with her when she was around 4 years old. Since that time we get together pretty often to work on craft projects together and many of them we share right here on the blog. The … [Read more...] about Get Creative with the Disney Princess Palace Pets Art Studio Kit
Kid’s Craft Project – Easy Halloween Masks from Craft Foam
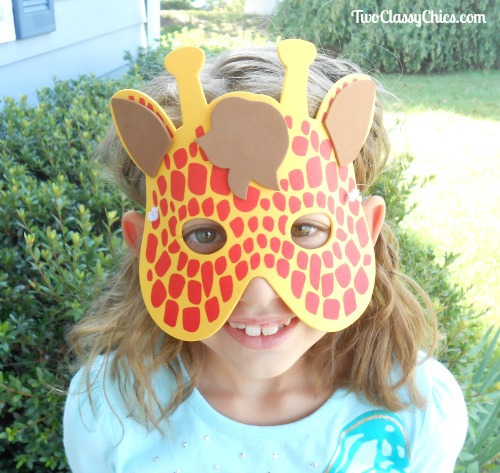
Every year when Halloween rolls around I love decorating my home to get ready for Trick or Treat night. One of the things I really look forward to seeing is all of the kids dressed up in their Halloween costumes. When it comes to costumes, I love seeing the homemade ones & the creative ones that … [Read more...] about Kid’s Craft Project – Easy Halloween Masks from Craft Foam
Craft Project: Duct Tape Pencil Case
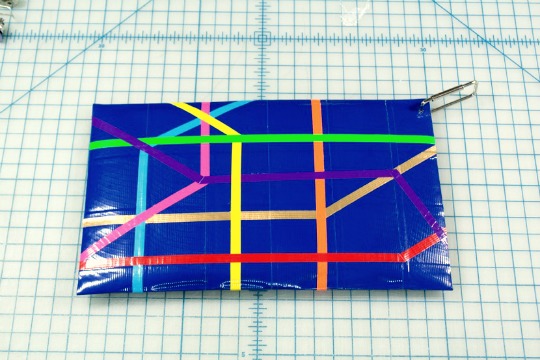
Our kids are back in school and even though school has started, some kids may still need some extra school supplies. Today's craft project is a DIY Pencil Case that is made out of Duct Tape. Who knew that duct tape could be used for so many different things! The project is courtesy of Fabian … [Read more...] about Craft Project: Duct Tape Pencil Case
Kid’s Craft Project: Friendly Moldable Plastic Coat Pins
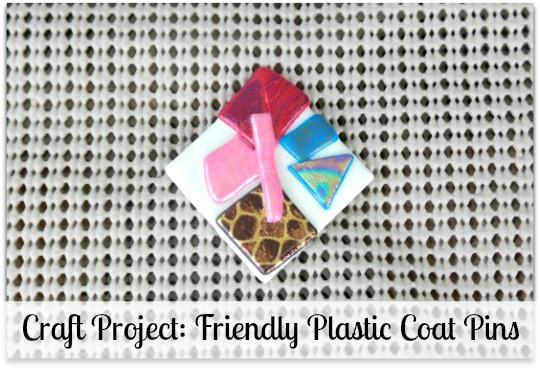
It's hard to believe but Summer is quickly winding down and Fall will be here before we know it. As the kids go back to school, I start thinking about the holidays. I don't know about all of you, but I like getting a jump on my holiday craft projects before the season even begins! Last week the … [Read more...] about Kid’s Craft Project: Friendly Moldable Plastic Coat Pins
Easy-to-Make Peppa Pig Kid’s Craft Projects

In honor of the newly released "Peppa Pig Sunny Vacation" kid's DVD, we thought we would get crafty with some new Peppa Pig craft projects. Both of the projects we are featuring today are great for preschoolers and young elementary school-aged children to do, with some assistance from the adults. In … [Read more...] about Easy-to-Make Peppa Pig Kid’s Craft Projects