
For the past 18 months we've shared numerous kid's craft projects with all of you here on the blog. We've painted on smooth river rocks and on large clam shells (seashells) which my granddaughter loves to do! Well, if you've enjoyed all of those kid's craft projects, you're going to enjoy the how-to … [Read more...] about Stone Painting for Kids Book – Designs to Spark Your Creativity
kid's crafts
Kid’s Craft Project Easy and Affordable Suncatchers
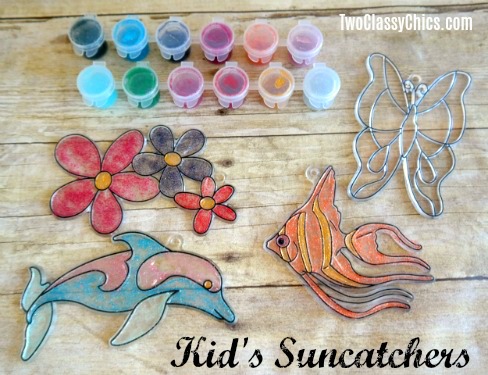
Winter has finally sunk in around here and we've been spending a lot more time indoors. I've been trying to keep my 8 1/2 year old granddaughter busy with some easy and affordable craft projects, which she loves to do. On a recent trip to my local craft supply store I found some goodies on sale and … [Read more...] about Kid’s Craft Project Easy and Affordable Suncatchers
Kid’s Crafts: Learning About Rocks and Minerals with Geodes

Today's crafting with kids feature is something just a little bit different. I think that any time we can teach our children fun science things and make it fun...well, that's a good thing! My 8 1/2 year old granddaughter loves rocks, minerals and seashells. She's started collecting them about 3 … [Read more...] about Kid’s Crafts: Learning About Rocks and Minerals with Geodes
Kids Crafts – DIY Painted Ceramic Piggy Banks

Looking for an easy craft project to do with the kids this winter? If so, we've got a fun one to tell you about today. The best thing about this kid's craft project is that everything that you need comes packaged in an affordable craft kit from Yoobi! * Complimentary Product Received for … [Read more...] about Kids Crafts – DIY Painted Ceramic Piggy Banks
Kid’s Paint Brush Pen and Stencil Set from Yoobi

Looking for easy craft projects to do with the kids this winter? If so, we've got a fun one to tell you about today. The best thing about this kid's craft project is that everything that you need comes packaged in an affordable craft kit from Yoobi! The ONLY thing you need to add to it is a painting … [Read more...] about Kid’s Paint Brush Pen and Stencil Set from Yoobi
Kid’s Crafts Hand-Painted Holiday Seashell Decorations

Over the past 2 months we've shared many kid's craft projects with you having a holiday and Christmas theme. The countdown to Christmas is on and you still have some time to whip up some fun holiday decorations! Today's Kid's Craft Project features 2 hand-painted seashells that my 8 1/2 year old … [Read more...] about Kid’s Crafts Hand-Painted Holiday Seashell Decorations
Get Crafty with the Yoobi Super Melty Bead Kit

Christmas is only a week away, but you still have time to whip up some quick and easy crafts. Today’s Crafting with Kid’s Feature let’s children get creative with beads! With this one kit they can make all kinds of cool things! * Complimentary Product Received for Review. First, let me tell … [Read more...] about Get Crafty with the Yoobi Super Melty Bead Kit
DIY Easy Snowball Snowman Holiday Ornaments

Looking for some last-minute holiday crafts that the kids can do? If so, I think you'll really appreciate our kid's craft project that we're featuring today. One of our sponsors for our regular crafting with kids projects here on the blog has graciously donated a craft kit for us to use and feature … [Read more...] about DIY Easy Snowball Snowman Holiday Ornaments