
Over the past 3 years we've shared many kid's craft projects with you that utilize smooth river rocks or large seashells. You can find our past kid's craft projects right here on the blog. This time around we're utilizing smooth river walks that we've collected down by a local river. This project is … [Read more...] about Kid’s Craft Project: Painted MOUSE River Rocks
kid's crafts
Having Fun at The Home Depot Kid’s DIY Workshops
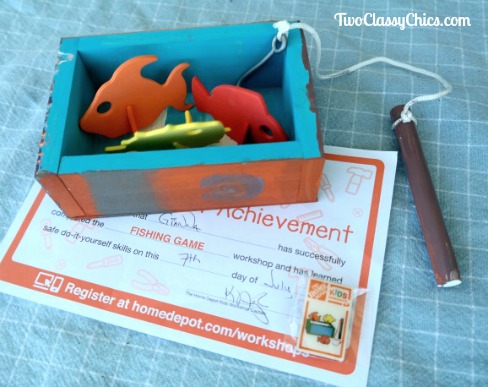
For the past 16 months we've been taking our granddaughter to The Home Depot kid's DIY Workshops and she absolutely loves them! If you have children or grandchildren, you really need to check them out. * This post is NOT affiliated with The Home Depot in any way. The workshops are FREE for … [Read more...] about Having Fun at The Home Depot Kid’s DIY Workshops
Halloween Craft Project: Painted Oyster Shell Ghosts

Two of the most common type's of seashells that you'll find laying around on the beach at the Jersey Shore happen to be Oyster Shells and Clam Shells. Every time we're down at the beach, I collect all of the seashells that I can find and bring them home to use in my craft projects. Today's … [Read more...] about Halloween Craft Project: Painted Oyster Shell Ghosts
Kid’s Crafts: Painted Seashells for Halloween

Over the past 2 years we've been painting on seashells and making different designs for the holidays throughout the year. We like to display our painted seashells out on the front porch, the back deck, in our flower beds, lining the sidewalk and/or steps, etc. We coat all of our painted designs with … [Read more...] about Kid’s Crafts: Painted Seashells for Halloween
Hand-Painted Jack Skellington Seashells for Halloween

For the past year we've shared over a dozen hand-painted seashells, clam shells and river rock projects with all of you. The majority of these projects can be made with older children and some "light" adult supervision. With Halloween just around the corner, we wanted to feature one more … [Read more...] about Hand-Painted Jack Skellington Seashells for Halloween
Halloween Craft Project – Painted Frankenstein Seashells

Last fall we kicked off an entire series of hand-painted seashells and clam shells here on the Two Classy Chics blog. Since that time we've shared with you Halloween, Christmas, Spring and Summer designs. You can find them in the CRAFTS section here on the blog or over on our boards on … [Read more...] about Halloween Craft Project – Painted Frankenstein Seashells
Kid’s Birthday Party Construction Helmet Craft Activity

My son recently turned 3 years old and we hosted his birthday in our home and did all of the decorating ourselves. We enjoy hosting birthday parties for our children and this year we did a Construction Site theme for his party. My son is really into construction vehicles, diggers, dump trucks, bull … [Read more...] about Kid’s Birthday Party Construction Helmet Craft Activity
Halloween Craft Project Painted Candy Corn Seashells

We've been having a lot of fun over the past few months hand-painting several holiday designs onto seashells and large clam shells that we collected while down at the beach. I think we have 4-5 different designs now for every holiday and season throughout the year. We love putting them on our front … [Read more...] about Halloween Craft Project Painted Candy Corn Seashells