
A few weeks ago I was have a chat with my grandchildren about pet rocks and they had no idea what they were. When I was a child, even when my daughter was a child, making & having a pet rock was a popular thing. I thought it was a craft project that most children did or at the very least, knew … [Read more...] about Vintage Kid’s Crafts: Pet Rocks and Pet Seashells
kid's crafts
Painted Yellow Chicks Seashells for Easter Decorating

Easter this year falls on Sunday April 21st. I'm one of those people who prefer for it to fall in late March or in early April. I just prefer the holidays to be more evenly spread out, especially after a long winter season. * This post contains affiliate links. Anyway, I've got another … [Read more...] about Painted Yellow Chicks Seashells for Easter Decorating
Easy St. Patrick’s Day Painted Seashells

Looking for an easy St. Patrick's Day craft project to do with the kids? Got a few seashells laying around the house or leftover from summer vacation? If so, we've got a fun and easy project for you today! We made these adorable St. Patrick's Day painted seashells with 9 - 11 year old's. If you … [Read more...] about Easy St. Patrick’s Day Painted Seashells
Kid’s Crafts: Painted Sports Ball Themed River Rocks

Children love to play various sports and will often try out several different type's of athletic sports until they settle on their favorite. Our granddaughter enjoys playing soccer and golf, while my grandson enjoys baseball and basketball. Today's kid's craft project is for children who enjoy … [Read more...] about Kid’s Crafts: Painted Sports Ball Themed River Rocks
Kid’s Craft Project: Mermaid Seashell Compact Mirror

My 9 year old granddaughter loves to craft and has been crafting with me since the age of 4. A few weeks ago she found some inspiration over on Pinterest for us to make a Mermaid Seashell Compact Mirror. Just like most little girls, she loves girly things and she likes a lot of bling on them! We … [Read more...] about Kid’s Craft Project: Mermaid Seashell Compact Mirror
Kid’s Crafts Hand Painted Piggy River Rocks

We like to take our grandchildren out for nature walks and hikes. When we're outdoors we like to collect smooth river rocks, acorns, driftwood, seashells and other items that we find. We collect these items and store them for later use when we need to whip up some nature inspired craft … [Read more...] about Kid’s Crafts Hand Painted Piggy River Rocks
Kid’s Crafts: Painted Minions River Rocks
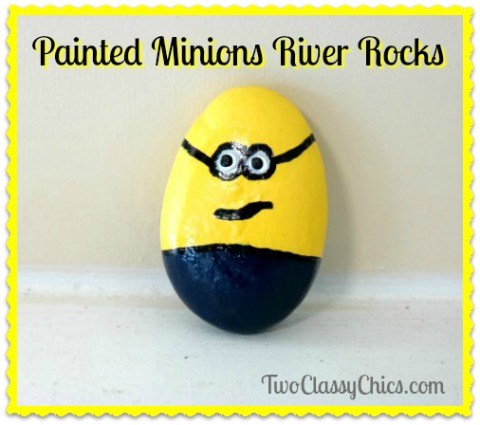
I haven't met a kid who didn't love the minions! Well, that goes for the adults too! Today's crafting with kids craft project features those adorable minions and you'll only need a few supplies to make them! We made this project with a group of kids ages 7 to 10 years of age. Kid's Crafts: … [Read more...] about Kid’s Crafts: Painted Minions River Rocks
Craft Project: Painted Raccoon Design Seashells

Two years ago I started posting my hand-painted seashell craft projects here on the blog and so far...they're some of our most-popular posts! I love crafting with seashells because they're FREE and just need to be collected off of the beach. They're some of the most inexpensive crafts that you can … [Read more...] about Craft Project: Painted Raccoon Design Seashells