Tag: kid’s crafts

Painting and Decorating Small Seashells from Summer Vacation

Painting and Decorating Small Seashells from Summer Vacation

Heading to the beach for summer vacation? If so, collect some small seashells while you’re there! Not visiting a beach? Don’t worry, you can buy bags of small seashells from your local craft store, Dollar Tree or from Amazon for a great price. All of 

Hand Painted Solar System and Rockets Seashells for Kids

Hand Painted Solar System and Rockets Seashells for Kids

My grandson loves anything that has to do with the solar system, rockets, outerspace, etc. He’s just amazed by the fact that there are things thousands of miles up into the sky that he can’t visible see. While he enjoys cars and trucks like most 

3 Easy Hand Painted Clam Shell Designs

3 Easy Hand Painted Clam Shell Designs

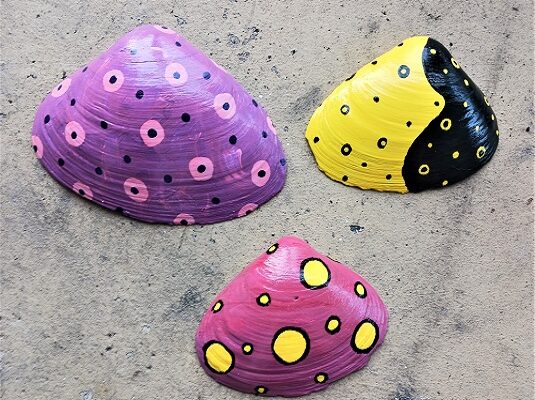
3 Easy Hand Painted Clam Shell DesignsOver the past 12 years I’ve posted 150+ painted seashell designs on the Two Classy Chics blog. You can find designs that are seasonal, holiday related, animals, flowers, or designs that are just colorful and fun! With that said, I’m often asked about EASY designs that any skill level could do. Well, today…I’ve got 3 designs that are easy to make. You can make them in any color combination that you like.

* Post contains affiliate links.

You’ll need clean clam shells that measure 3″ to 5″ in width. We collected them from the beach and washed them in warm, soapy water using Dawn Liquid Dish Soap. Rinse with clean water and air dry for 1-2 days. They need to be clean and dry before painting on them.

Star off by base coating the seashell in your desired color. You can do the entire shell in that color or split it into two. Think about the color scheme that you want to use and colors that work well together. These designs are simple because all you’re doing is making dots and circles. That’s right…dots and circles!

We used acrylic craft paint and a paint brush to make the circles but used a black acrylic paint pen to outline those circles and to make the polka dots. Using a paint pen gives you better control and the best thing for outlining or writing wordage. You can follow the patterns in my photograph or come up with your own.

Tips – Limit the color choices that you’re using on one shell. Make sure those 2-3 colors work well together. Let the base coat thoroughly dry before decorating it with circles and dots. You can make all of your circles the same size or vary them but don’t use too many different sized circles at one time. You want a cohesive look. Don’t be afraid to mix 2-3 colors together and swirl them around on the shell to come up with your own unique color pattern when base coating. The purple shell has swirls of pink within it.

Once the seashells are completely dry you need to seal them using Modge Podge Clear Sealer and a foam brush. I like to give them 2 light coats of Modge Podge to seal the painted design. You’ll need to allow 30-45 minutes between the 2 coats. If you’re going to be displaying them outside…I recommend sealing the unpainted side too…so that you’re protecting the seashell 360 degrees around.

* This post contains affiliate links. If you make a purchase, we may or may not receive a small commission which helps to support this site. Thank you!

Shelly's Signature

Easter Bunny Felt Refrigerator Magnets Kid’s Craft Project

Easter Bunny Felt Refrigerator Magnets Kid’s Craft Project

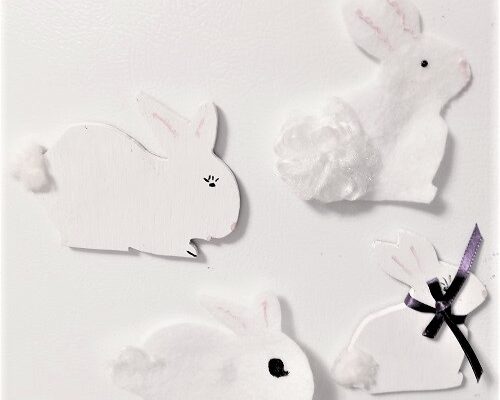
Last weekend the group of kids at our church sat down and made these cute Easter Bunny refrigerator magnets out of craft felt. They took less than 1 hour to make and cost less than .50 cents per child. For the template we picked up 

Easter Bunny Clothespin Refrigerator Magnet – Kid’s Crafts

Easter Bunny Clothespin Refrigerator Magnet – Kid’s Crafts

Last weekend we sat down with 5 children ages 7 to 13 years of age to make these super-easy Easter Bunny refrigerator magnets from wooden clothespins. Each one will cost you less than .50 cents to make if you buy your supplies from Dollar Tree. 

Easy Paint Pour Painted Seashell Designs

Easy Paint Pour Painted Seashell Designs

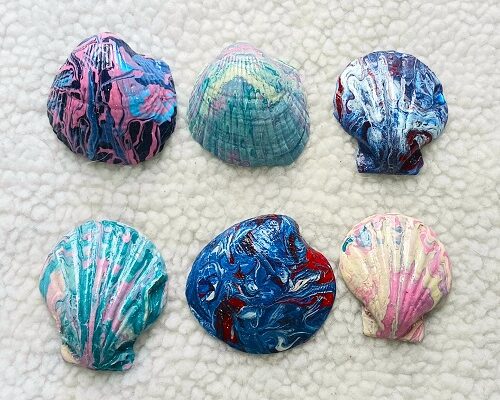
Easy Paint Pour Painted Seashell DesignsHave you tried paint pouring yet when it comes to painting seashells and river rocks? If not, give it a try! It’s an easy way for you and the kids to paint them! You don’t need any artistic skills and you don’t need a lot of art supplies to make them. It’s one of the easiest ways to decorate them.

Here are the supplies that you’ll need:

Seashells or Smooth River Rocks
Several Bottles of Acrylic Craft Paint
Clear Acrylic Spray Sealer – Glossy Finish
Plastic Drop Cloth (something to protect your surface as this can get messy)
Old Plastic Placemat

Note – For paint pouring I like to use plastic medicine cups. You know…those little plastic cups that come with liquid cough medicine, infant fever reducer, etc. They’re the perfect size for mixing the acrylic craft paints.

Make sure all shells and rocks are clean and dry. Decide on a color scheme. I like using only 3-4 colors that work well together. See my photograph for some ideas on colors that play nicely together.

Easy Paint Pour Painted Seashell Designs

Squirt a few drops of each color into the plastic medicine cup. For example on the patriotic one I used Navy Blue, Medium Blue, White and Red acrylic craft paint colors. I squirted 3 drops of navy blue, 2 medium blue, 2 red and 2 white into the cup. Gently move the cup side to side to kind of swirl the paint colors together. You don’t want to stir them together as that will make an entirely new color!!!

We like to paint pour over the kitchen sink so that as the paint runs off the shells we can easily wash it down the drain. Gently pour the paint out of the cup and onto the seashell. As you’re doing that…move the seashell around to let the paint run over all surfaces of the shell. You want to cover it all. As you move the shell around the paint runs and makes beautiful swirl-type of designs.

Once it has been covered in paint place it on an old plastic placemat to dry. Don’t have one? A sheet of aluminum foil works great as a non-stick surface too! It will take a few hours for them to air dry. After drying…you’ll want to have an adult take them outside to spray each one with 1-2 coats of a Clear Acrylic Spray Sealer. We used one with a glossy finish. This protects the painted surface. Let dry for several hours.

* This post contains affiliate links. If you make a purchase, we may or may not receive a small commission which helps to support this site. Thank you!
Shelly's Signature

Sunee Acrylic Dual-Tip Paint Markers for Art and Craft Projects

Sunee Acrylic Dual-Tip Paint Markers for Art and Craft Projects

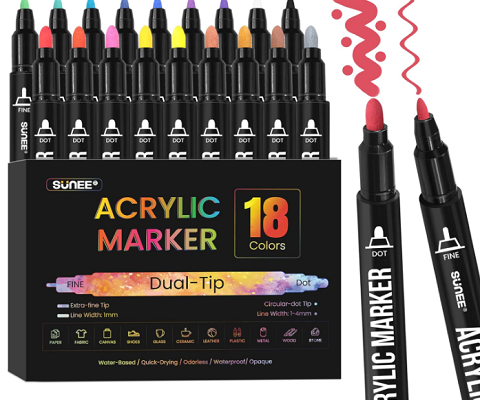
I do a lot of painting on ceramic, glass, tiles, seashells and smooth river rocks. I share hundreds of arts and crafts projects on the TCC blog every year. One thing that I require in the projects that I share are 1. affordability 2. Easy 

Valentine’s Day Painted Shells Kid’s Greeting Cards

Valentine’s Day Painted Shells Kid’s Greeting Cards

My granddaughter is a Girl Scout and every year they host a little Valentine’s Day party. The parents get together to provide the finger foods and drinks, provide a few fun games to play along with music for the girls to enjoy. Some of the