Tag: Gardening Products and Tips

Shelly’s Spring Flower Gardening Ideas

Shelly’s Spring Flower Gardening Ideas

Over the past few years I’ve shared with you my love for flower gardening. I’m by no means an expert and don’t pretend to be one. I’ve been enjoying gardening for the past 6 years and my love for it continues to grow. Every season 

DIY Seashell Plant Picks and Garden Markers

DIY Seashell Plant Picks and Garden Markers

A few months ago when we were down at the beach house I collected some bay scallop seashells off of the beach. The bay scallops along the Jersey Shore are typically black to dark gray in color. They are great shells to use in a 

Craft Project: Razor Clam Shells Painted Garden Plant Markers

Craft Project: Razor Clam Shells Painted Garden Plant Markers

Craft Project: Razor Clam Shells Painted Garden Plant MarkersOver the years I’ve collected thousands of different seashells while walking the beach. A lot of my craft projects utilize clam shells and conch shells. With that said, I had an entire box of Razor Clam Shells and needed to find a way to use them. Well, I have and I look forward to sharing my new project with all of you.

If you enjoy painting on seashells or crafting with seashells…you’ll find over 70+ seashell craft projects right here on the Two Classy Chics blog! We will be sharing more seashell craft projects in the future too!

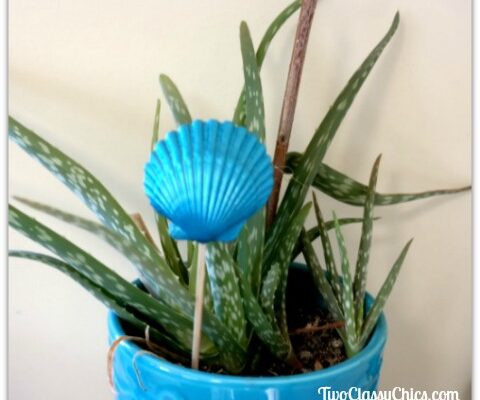
These Razor Clam Shells can be used as garden plant markers or indoor houseplant markers. You can leave them in their natural unpainted form and just use a Sharpie Marker to write the name of your plant on the front of the seashell. If you like color, you can hand-paint them and do the same thing!

Razor Clam Shells Seashells

Unfamiliar with what a Razor Clam Shell looks like? They’re long, skinny white seashells as shown in my photograph above. After collecting them you’ll want to wash them and remove all of the sand and debris. I like to use a Mr. Clean Magic Eraser to clean up my seashells and then let them thoroughly dry.

Craft Project: Razor Clam Shells Painted Plant Markers

I opted to paint mine with acrylic craft paints. I had to use 2-3 coats of paint and I only painted the one side as I wanted the other side to look natural…just like a seashell. I left them dry for 2-3 hours or until the paint was no longer tacky. You can then use Sharpie Markers to write on the plant’s name or use acrylic craft paint and a paint brush. If using Sharpie Markers, let dry for 30 minutes. If you’re painting on the name you’ll want to allow it to dry for 1-2 hours.

To protect the painted finish you’ll want to take them outside and lay them down onto newspaper or an old plastic placemat. You’ll want to spray the painted surface with 2 coats of clear acrylic sealer, allow each coat to dry for 30 minutes before spraying on an additional coat. Let them dry for 6-8 hours or overnight. You can now use them out in your garden, flower beds or place them in some of your indoor houseplants.

Craft Project: Razor Clam Shells Painted Plant Markers

If you’re a stickler about paint and putting them in your veggie garden, you can indeed buy non-toxic, food-safe paint and use those paints to decorate your Razor Clam Shells. The ones that I had used on some of mine took an extra-long time to dry. If you don’t want to use paint at all, leave them in their natural form and just use a Sharpie Marker to write on the name of your plant.

Super-easy and a great way to use up some of those seashells that you find laying around on the beach!

* This post contains affiliate links. If you make a purchase, we may or may not receive a small commission which helps to support this site.

Shelly's Signature

How to Dry Bell Pepper Seeds to Plant Next Year

How to Dry Bell Pepper Seeds to Plant Next Year

Every year we plant a garden in our backyard and every year, it gets bigger than the year before. This past summer we had a really great crop of bell peppers, so I wanted to save some of our pepper seeds to plant next year. 

Kid’s Crafts: Painted River Rock Garden Markers

Kid’s Crafts: Painted River Rock Garden Markers

Every year we plant a backyard garden and I’m always looking for ways to label and mark my plants. We typically start our seedlings in late March and try to plant them about 6-7 weeks later. While out on a nature walk a few weeks 

DIY Coastal Style Terracotta Flower Pots

DIY Coastal Style Terracotta Flower Pots

DIY Coastal Style Terracotta Flower PotsI have a lot of indoor houseplants and I have to admit, I’m pretty good at growing them. Back in late Spring I decided to grow some starters and last week they were finally rooted and ready to be planted. I decorate my home in a coastal and beach style and needed some new flower pots. Since I can never find any that fit within my decor theme, I decided to make my own.

I headed out to my local craft store and picked up some supplies. If your local craft store doesn’t sell plain terracotta pots, you can find them at your local garden & home goods store.

DIY Coastal Style Terracotta Flower Pots

Terracotta Flower Pots with Saucers
White Acrylic Craft Paint
Gold Metallic Acrylic Craft Paint
Paint Brush, Water Dish, Paper Towels
Various Medium-Sized Seashells
E6000 Adhesive Glue

I painted the outside of my terracotta pots with 2 coats of white acrylic paint and the inside & outside of my saucers. I left them dry for 1 hour. I then painted the outside top rim and inside top rim of the planters with gold metallic acrylic paint. When painting the inside, you want to paint a 2″ to 3″ band…that way you won’t see the original color of the pot once you put your dirt (potting soil) into the pot. I then added a 1/4″ wide band of gold metallic acrylic paint around the saucer to add a little bit more pizzazz. It was looking to plain on the bottom, so I felt the need to add the band around the saucer. Metallic paint takes a little longer to dry, so you’ll want to allow about 90 minutes to pass before proceeding on.

DIY Coastal Style Terracotta Flower Pots

You can decorate the front of your flower pots with various seashells. I used E6000 adhesive glue to add the scallop seashell on the front of the pot shown in this post. You an also use sand dollars, starfish, etc. Just make sure that the part that you’re adding the glue onto is flat or semi-flat in nature. You might have to hold it in place for 3-4 minutes or use a piece of tape to hold it in place until the adhesive has set.

Additional Tips: I’m using these specific flower pots indoors. If you want to use them outside, I recommend spraying them with 2 coats of a clear acrylic sealer which will protect the painted finish from chipping and cracking. If you want to save time, you can spray paint them white or you can use white acrylic paint and paint them by hand.

* This post contains affiliate links. If you make a purchase, we may or may not receive a small commission which helps to support this site.

Looking for more great ideas on coastal style gardening flower pots and planters? You can check out my previous posts:

* Wishing Well Flower Planter
* Vintage Style Metal Watering Can Planter
* Metal Sand Bucket Flower Planter

I’ve got all kinds of different coastal style gardening ideas right here on the Two Classy Chics blog.

Shelly's Signature

Sneak Peek at Shelly’s Flower Gardens

Sneak Peek at Shelly’s Flower Gardens

If you’ve been following this blog over the past 9 years, you’ll already know that I love gardening. I have 6 flower gardens (gardening beds) outside and inside my home I grow a lot of indoor plants. I admit, I’m no expert in the field 

Perennials vs. Mowing:  If You Dislike Mowing, You Need More Flowers and Shrubs

Perennials vs. Mowing: If You Dislike Mowing, You Need More Flowers and Shrubs

Many people would like to live in a natural environment, but are often discouraged by the sheer amount of work it takes just to maintain it so overgrowth doesn’t become a problem. Apart from living in an urbanized, concrete environment, is there another way? Well,