Tag: crafts

Oil-Based Waterproof Paint Pen Markers for Arts and Crafts

Oil-Based Waterproof Paint Pen Markers for Arts and Crafts

We share a lot of arts and craft projects on the TwoClassyChics blog that involves painting on river rocks and seashells. When painting on those surfaces it’s important to use a great set of Paint Pen Markers. Not all of them are created equally, you 

Make Pom-Poms Quickly and Easily with a Knitting Loom

Make Pom-Poms Quickly and Easily with a Knitting Loom

Shelly and I make a lot of knitted and crochet hats and beanies for the local cancer treatment center. We like to donate 50-75 of them a year. All of the patients really appreciate receiving free hats while going through their cancer treatment. Some of 

Quick and Easy Way to Make Pom-Poms with the Fluff Ball Weaver

Quick and Easy Way to Make Pom-Poms with the Fluff Ball Weaver

WH Fluff Ball Weaver Pom-Pom Maker Kit
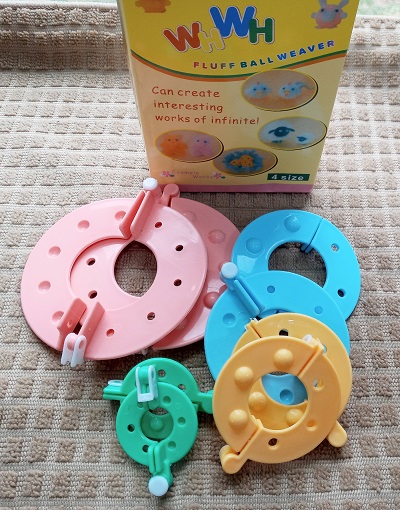
Looking for a quick and easy way to make pom-poms for your craft projects? If so, you’ll want to check out the WH Fluff Ball Weaver Pom Pom Maker Kit that I purchased from Amazon. It’s affordable and easy-to-use! It’s better than the old-fashioned way of wrapping yard around a piece of cardboard and you get more consistent results.

It comes with 4 plastic looms to make 4 different sized pom-poms. You can make a 3.5 cm, 5.5 cm, 7 cm, and a 9 cm using the included looms. You will need to supply your own yard, silk, ribbons, scissors, etc.

How to Make a Pom Pom

The back of the box has printed (brief) instructions which aren’t well-written and a tad hard to understand. With that said, I used the included diagrams and just followed those. In total it takes 6 steps to make one pom-pom. Took me about 30 minutes to get the hang of it and now I can whip up a fluffy ball of yarn within 3-5 minutes!

For the price…I think it’s fabulous! Me, my 71 year old mother and my 13 year old granddaughter have all been using it. We now get consistent results when making pom-poms for our arts and craft projects. Plus, Mom and I make beanies and hats that we donate to the cancer center. We use the full balls on top of the hats! They look adorable!!!

* This post contains affiliate links. If you make a purchase, we may or may not receive a small commission which helps to support this site. Thank you!

Disclosure: Item was personally purchased by the writer who paid full price. The writer is sharing his/her personal opinion on the product with the readers of the TCC blog. Your opinion may differ.

Shelly's Signature

Disney FROZEN Crochet Starter Craft Kit

Disney FROZEN Crochet Starter Craft Kit

How many of you like to sit down and crochet? I really enjoy it as a way to relax and a way to be creative. Over the decades I’ve made afghans, table runners, scarves, hats, mittens, gloves, toys for my grandchildren, sweaters, booties, a poncho 

Classic Disney Crochet Starter Kit

Classic Disney Crochet Starter Kit

How many of you like to sit down and crochet? I really enjoy it as a way to relax and a way to be creative. Over the decades I’ve made afghans, table runners, scarves, hats, mittens, gloves, toys for my grandchildren, sweaters, booties, a poncho 

Coastal Crafts: Seashell Covered Wood Dolphin Wall Art

Coastal Crafts: Seashell Covered Wood Dolphin Wall Art

Coastal Crafts: Seashell Covered Wood Dolphin Wall ArtI’ve been collecting seashells for 35+ years. When I say collecting, I’m talking about seashells that I’ve personally picked up off of a beach somewhere during our travels. I bring them home, clean them up, sort them and use a lot of them in my craft projects which you will find around my home. If you love the beach you would love my home decor coastal style.

* This post contains affiliate links.

A few months ago I shared with you my Coastal Crafts: Seashell Covered Wood Seahorse Wall Art project and you can visit that blog post to learn more about it. After completing that first wall art piece I decided to make a few more! Some of them I’m keeping and others are being gifted to friends and family members. Three that I recently made were orders that I received from a Bed & Breakfast Inn.

To get started you want to decide on which marine animal you want to make. I chose a dolphin and then headed online to find a free dolphin template. I used Google image search to find the shape that I wanted. I re-sized the image (template) and made it larger. I sent the image to a local print shop (my image was too large for my home printer) and they printed it out for me (cost only $5.00). I used that image as my pattern.

Coastal Crafts: Seashell Covered Wood Dolphin Wall Art

Hubby had some scraps of pallet wood laying around and piece them together with small wood nails and glue. He used his saw to cut out my dolphin shape and his sander to smooth it down. We didn’t make it too smooth because I’m covering up the entire surface with paint and seashells. I painted all sides with 2 coats of white paint and left it dry overnight.

You need to sort through your seashells. I like to sort mine my type and then size. You’ll need tiny, small and medium sized shells for this project. Make sure that they’ve been properly cleaned. You don’t want any fishy odors or debris on them.

Lay your paper pattern out onto the floor or table top. Place shells in a pattern that you like on top of your paper pattern. This process took me 1-2 hours as I move shells all around until I get them exactly the way that I want them. I only do this for the outline of the piece. You’ll fill in that outline with tiny and small shells that can easily be mixed and matched. This will give you some direction on shell placement.

Coastal Crafts: Seashell Covered Wood Dolphin Wall Art

To glue them onto your wood shape you’ll need to use a combination of E6000 Adhesive Glue and a Hot Glue Gun with Glue Sticks. I use the E6000 Adhesive for all of my shells that go around the perimeter of the shape and for medium sized shells (they’re weightier). It does take 2-3 hours to dry. I use the hot glue gun to adhere the tiny and small shells when filling in the rest. Use a hair dryer set on the cool setting to “blow off” any of those icky strings of hot glue!

Coastal Crafts: Seashell Covered Wood Dolphin Wall Art

For this particular piece I used a combination of seashells: scallops, surf clams, razor clams, slipper shells, oyster shells, tritons, spirals, jingles, tiny whelk shells, small pieces of white coral, moon shells, broken sand dollars, etc. For the eye…you need for that to stand out. You can use a darker colored Moon Shell or Sea Urchin which looks nice too.

To finish up you need to protect your masterpiece with 2-3 coats of clear acrylic spray sealer. You can use a matte finish (I like that best) or a glossy finish. Do that outside on a nice weather day as it does have an odor to it until it dries. On the back you’ll want to add a saw tooth hanger so that you can hang it up onto your wall.

* This post contains affiliate links. If you make a purchase, we may or may not receive a small commission which helps to support this site. Thank you!

Shelly's Signature

Fun, Frugal, Finds: Bargain Deals on Craft Supplies

Fun, Frugal, Finds: Bargain Deals on Craft Supplies

I love arts and crafts. Matter of fact…I have an entire room in my home dedicated to it. You’ll often find me during my “free time” down in my craft room whipping up a new project. Many of those arts and craft projects are shared 

7 Must-Have Craft Room Adhesives and Glues

7 Must-Have Craft Room Adhesives and Glues

I’ve been crafting for 40 years and have an official craft room in my home. I enjoy dabbling in all kinds of different crafting mediums from needlework to woodwork, paper crafts to beading, and everything in between. Over the years I’ve learned that there are