
In the realm of creativity, there’s an undeniable charm in pieces that dazzle and capture the eye. Whether you’re designing garments, crafting accessories, or even sprucing up home décor, the subtle use of sparkle can elevate your work from mundane to magnificent. Here are some practical tips to … [Read more...] about Tips for Adding Sparkle and Elegance to Your Creative Work
crafts
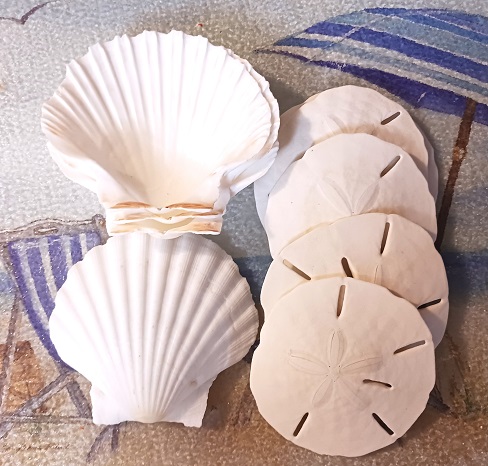
Bargain Deals on Coastal Beach Home Decor and Craft Supplies
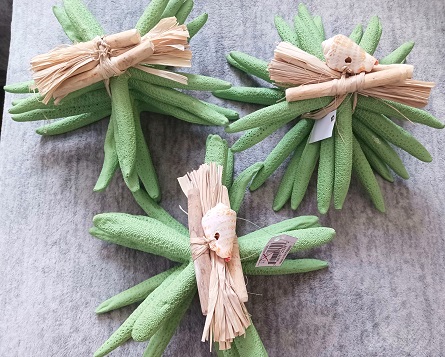
Last month I visited a gift shop down in Cape May, New Jersey. I decorate our home in a coastal beach style and I'm always looking for new home decor accessories or craft supplies. The first thing I do when shopping a tourist-style gift shop is look for a clearance section. Some stores have them and … [Read more...] about Bargain Deals on Coastal Beach Home Decor and Craft Supplies
Sewing with Viscose: Everything You Need to Know

One of the greatest things about knowing how to sew is that it allows you to create garments that suit your body and style. Another awesome thing is that you get to choose the fabric you want your garment to be made from. Experimenting with different fabrics helps you discover what works best for … [Read more...] about Sewing with Viscose: Everything You Need to Know
Shopping for Affordable Craft Supplies at Second-Hand Stores
Let's face it...the cost of everything has gone up and that includes arts and craft supplies. Over the past 4 years or so, I've seen some of my favorite products double in price. Inflation and supply-chain issues have caused most of it, but not all of it. For awhile, I thought I would have to give … [Read more...] about Shopping for Affordable Craft Supplies at Second-Hand Stores
LOVE Valentine’s Day Hand-Painted Seashells
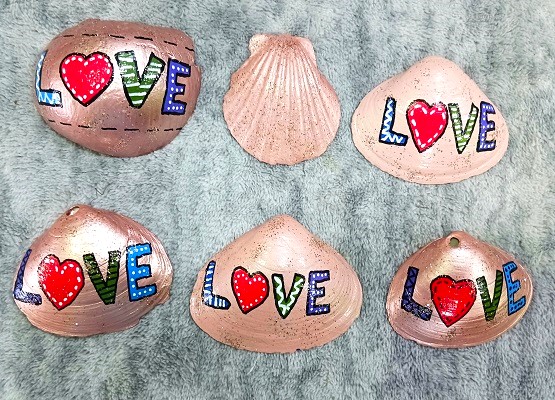
Two weeks ago I sat down and hand-painted some Valentine's Day themed seashells for my granddaughter's upcoming Valentine's Day party. She wanted to use them as part of the table decor and party favors. In addition, she requested that I make them in non-traditional Valentine's Day colors. You of … [Read more...] about LOVE Valentine’s Day Hand-Painted Seashells
Ball and Chain Beaded Keychain Rings for Crafting

I enjoy making all kinds of different crafts...from pieces that I display in our front yard to items that become home decor. Jewelry, Christmas Ornaments, Yard & Garden Art, Coastal Beach Crafts, Keychains & Purse Charms, Quilting & Sewing are just a few of the arts and crafts that I … [Read more...] about Ball and Chain Beaded Keychain Rings for Crafting
Innovative Ideas for Crafting Unique Candle Shapes

There’s something magical about candles that goes beyond their warm glow. A uniquely shaped candle can transform any space, making it a personal expression of creativity. Whether you’re a hobbyist or a seasoned candle maker, the desire to craft visually striking, one-of-a-kind candles is a challenge … [Read more...] about Innovative Ideas for Crafting Unique Candle Shapes
Hand Painted Jack-o-Lantern Pumpkins Clam Shells Seashells

When it comes to fall decorating I like to whip up a few new autumn inspired craft projects every year. When it comes to crafting, I like quick and easy projects that don't cost a lot of money. These hand painted Jack-o-Lantern Pumpkins are adorable! The designs were painted onto clam shells … [Read more...] about Hand Painted Jack-o-Lantern Pumpkins Clam Shells Seashells