Tag: craft projects

Tooli-Art 18 Acrylic Paint Pens with Dual Tips

Tooli-Art 18 Acrylic Paint Pens with Dual Tips

Over the past 12+ years I’ve shared hundreds of various arts and crafts projects on the TwoClassyChics blog. A lot of them involve seashell and rock painting. When working on those projects I use a combination of Acrylic Craft Paint (comes in a bottle and 

Breast Cancer Awareness Hand-Painted Seashell Designs

Breast Cancer Awareness Hand-Painted Seashell Designs

October is National Breast Cancer Awareness Month. Make sure you do a self-breast exam monthly and get a regular mammogram as your doctor advises. Stay up-to-date on all tests and exams!!!! To help spread the word about Breast Cancer Awareness…I decided to sit down and 

Hand Painted Wood Scarecrow Shelf Sitter for Autumn Decorating

Hand Painted Wood Scarecrow Shelf Sitter for Autumn Decorating

Hand Painted Wood Scarecrow Shelf SitterThis adorable hand painted scarecrow is made from scrap wood, acrylic paints, and a few basic art & craft supplies. In just one weekend I was able to make 4 of them! They would look cute displayed on a shelf, mantle above the fireplace, on a windowsill, bookcase, etc. A great beginner’s project because you don’t need to be an artistic painter to make one!

You can make them any size that you would like. I was using scrap pine wood from my husband’s scrap pile. The head is one piece of wood measuring approximately 8″ high, 4″ wide by 1″ thick. The base measures approximately 5 1/2″ wide by 2″ by 1/2″ thick. The brim on his hat measures approximately 7″ long by 1″ by 1/4″ thick. Again, use whatever wood you have on hand and you can vary the sizes and make them shorter or taller.

Assembly – I used small nails made for wood. I tacked the head onto the base using 3 tiny nails. I tacked the brim of his hat on using 3 tiny nails. I then used wood putty to filled the holes. Once dry, a little bit of fine sand paper to smooth everything down.

The hat was painted using 2 coats of chocolate brown acrylic craft paint allowing for 40 minutes of drying time between coats. The head and base were painted using 2 coats of acrylic craft paint in a tan color allowing for 40 minutes of drying time between coats. The entire base is painted in those 2 colors, front, back, sides, and the bottom. Let dry until the paint is no longer tacky.

For the hair I used straw. I was able to pick up a large bunch of pre-cut straw at the farmer’s market for $1.00 which I then cut down into the size that I needed. See photograph. If you don’t have access to straw you can use raffia which you can buy at your local craft store or from Amazon. Run a line of glue underneath the hat brim across the top of his face. Add your pre-cut pieces of straw or raffia. Let dry. Once dry you can use sharp scissors to trim if needed.

Hand Painted Wood Scarecrow Shelf Sitter

Facial features were kept simple. Just two black oval shapes for the eyes, a red triangular shape for the nose and a black mouth. All using acrylic craft paint. Once dry…dip the end of the paint brush into white paint and dot on the inner eyes. Use a fine liner paint brush to make the black slash marks outlining the nose. Let dry until the paint is no longer tacky.

Take outside and spray with 1-2 light coats of a clear acrylic spray sealer. Make sure you spray the sealer on the straw & raffia too. This will help strengthen and protect it.  This will protect the painted finish from chipping, cracking, and fading. I personally like giving them 2 coats, that way I can display them inside my home or outside on our front porch or back deck.

For the finishing touches I went with a classic, simple look. I glued on a small artificial sunflower to the brim of his hat using Gorilla Glue. I had a piece of brown, bronze and dark navy blue ribbon in my scrap box and tied that around his neck…knotting it at the side. I used just a few dots of Gorilla Glue to tack it down into place. Let dry for 2-3 hours before displaying.

* This post contains affiliate links. If you make a purchase, we may or may not receive a small commission which helps to support this site. Thank you!

Shelly's Signature

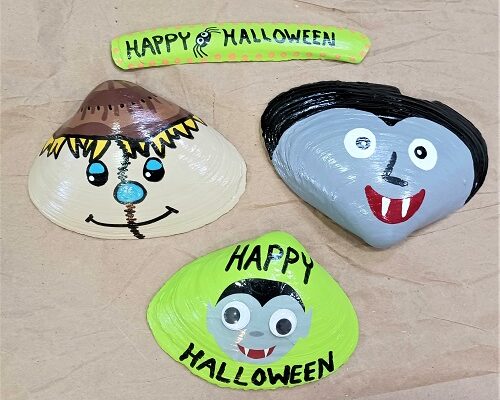
Scarecrow and Dracula Hand Painted Seashell Designs for Halloween

Scarecrow and Dracula Hand Painted Seashell Designs for Halloween

We just started our Fall and Halloween decorating. Time to get out all of your spooky looking ghosts, vampires, frankenstines, black spiders, skeletons, etc. Oh…what a fun time of the year to be decorating! Last weekend I sat down and painted 3 clam shells and 

DIY Nature Rock Wall Art Project Ideas

DIY Nature Rock Wall Art Project Ideas

Look for an inexpensive art and craft project? If so…head out on a nature walk through your neighborhood or local park to collect smooth rocks, pebbles, leaves, acorns, small twigs, seashells, and other small natural items that you find along the way. Once you collect 

Welcome Porch Sign with Painted Pumpkins for Fall Decorating

Welcome Porch Sign with Painted Pumpkins for Fall Decorating

I enjoy decorating my front porch during the Fall season and that includes Halloween. While I do put out items that are Halloween specific, I like to go with a more general Autumn motif that can be displayed now through Thanksgiving. You know…pumpkins, cornstalks, hay bales, squash, colored leaves, wheat stacks, wood wagons, gourds, and so forth.

* This post contains affiliate links.

Welcome Porch Sign with Painted Pumpkins for Fall Decorating

A few months ago I purchased a Welcome Porch Sign Stencil Kit from Amazon. That stencil kit has several different seasonal designs included with it. You can check out my previous WELCOME SIGN STENCIL KIT post for more detailed information on what I purchased.

Last weekend I gathered up some scrap wood (2 slats of wood from an old palette) and got busy making a new porch leaner sign for our front porch. Yeah, I raided my husband’s scrap wood pile again! I used wood glue and nails to attach the 2 slats together to make one panel of wood. I left that dry overnight.

To save time I spray painted the front and sides with white matte finish spray paint that I purchased at Lowe’s. I gave it 2 coats of paint with 1 hour of drying time between coats. Once it was thoroughly dry (not longer tacky) I laid out my stencils onto the wood. To get nice crisp edges with no paint bleeding you want to use a stencil adhesive and painter’s tape.

As you can see…my porch sign simply says WELCOME with an orange pumpkin for the letter O. Above the W and below the E….I stenciled on one wheat stem but opted to do it in a dark green color. I think it finishes it off nicely. Let all of the paint thoroughly dry. The next day I took it outside and sprayed all of the sides with 2 coats of a Clear Acrylic Spray Sealer with a matte finish. Allow 1 hour of drying time between coats. This will help to protect the painted finish from the weather elements. Easy to make!!!

* This post contains affiliate links. If you make a purchase, we may or may not receive a small commission which helps to support this site. Thank you!

Shelly's Signature

Beach Swimming Suit Hand Painted Seashells

Beach Swimming Suit Hand Painted Seashells

Before we say an official goodbye to the summer season I wanted to post one more summer themed painted seashells design idea. This swimming suit aka bathing suit design is really easy to make. It’s the perfect little handmade decor piece when hosting a backyard 

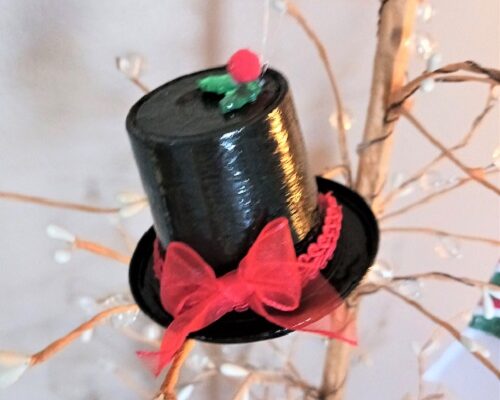
Recycled K-Cup Snowman Top Hat Christmas Ornaments

Recycled K-Cup Snowman Top Hat Christmas Ornaments

These adorable snowman top hat Christmas ornaments cost less than $1.00 to make! You will need to upcycle a few things from your kitchen and raid your leftover craft supplies scrap box to make them. You can make several of them over the course of