Tag: craft projects

Hand Painted Elephant Clam Shell Seashell Party Favors

Hand Painted Elephant Clam Shell Seashell Party Favors

A friend of mine hosted a Zoo themed birthday party for her 8 year old son. She asked me to come up with some unique party favors and table decor to go along with her Zoo animal theme. Well, I got busy and this Elephant 

Hand Painted Piano Keyboard Clam Shell Seashell Designs

Hand Painted Piano Keyboard Clam Shell Seashell Designs

I’ve been hand-painting on seashells for over 20+ years. When I first started out I would just paint them solid colors or a very simple stripe or polka dot pattern. Over the years I’ve learned to do better designs that really stand out. If you 

Hand Painted Capiz Shell Zentangle Design Suncatchers

Hand Painted Capiz Shell Zentangle Design Suncatchers

Hand Painted Capiz Shell Zentangle Design SuncatchersZentangle is a popular art form that anyone can do. It’s great for beginners and can be done in a wide variety of different surfaces. You can learn about the Zentangle art form by visiting one of the best websites HERE. You will also find great how-to videos over on YouTube. With that said…use the basics of Zentangle to come up with your own unqiue painting style.

** Post contains affiliate links.

Last month I decided to make a few homemade suncatchers using 5″ diameter Capiz shells. These type’s of seashells are flat and often come in a round or oval shape. I buy them from Amazon when I need them. You need to prep the shell’s surface before painting on it. Wash in warm soapy water using Dawn Liquid Dish Soap. Rinse with clean water and then lay it out to air dry. Once it has dried…take a little bit of alcohol over it. I use a cotton ball dipped in alcohol. Let it dry again. This preps the surface for painting.

Take them outside and spray with 1-2 light coats of white spray paint. You want to use one that gives you a flat finish. Don’t use semi-gloss or glossy. You can opt to hand-paint by using white acrylic paint and a paint brush. Allow for 30-45 minutes of drying time between coats. This is necessary if you want the colors that you’ll be applying on top…to really POP!

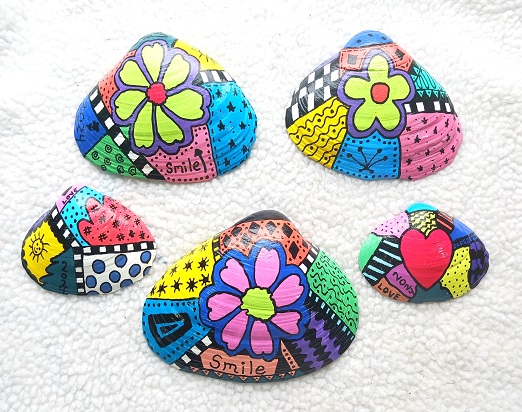
Use a pencil and sketch on the design. I like to make one focal point (the flower) and then section off everything around it. You don’t need a big focal point…you don’t need even-sized sections. Again, make this doodling art form your own! After sketching it’s time to color-in the design with paints. I use a combination of BETEM Acrylic Paint Markers and Tooli-Art Acrylic Paint Markers. I like using the BETEM for coloring in the sections. I like using the Tooli-Art fine-tip black paint marker for doing the doodling and outlining.

Hand Painted Capiz Shell Zentangle Design Suncatchers

When doing the design work take your time. Doodling is about what you feel at that moment. You can do bold or soft, you can do vivid colors or tone it down with neutrals. Pastels your thing? Yeah, you can do that too. I don’t believe in copying other people’s work…so do what naturally appeals to you. Work in sections until all of the design work has been completed. Let it dry for 4-6 hours to allow all of the paint to cure.

You can seal the design by one of two different methods:

1. Clear Acrylic Spray Sealer – Spray 1-2 light coats of a clear sealer on each side of the Capiz shell allowing for 1 hour of drying time between each coat.

2. Mod Podge Clear Sealer – I like using one that gives it a glossy finish. Brush-on 1-2 coats of clear Mod Podge Sealer allowing for 35-45 minutes of drying time between coats. It goes on white but dries crystal clear.

Thread a 1/8″ wide by 7″ long ribbon through the hanging hole at the top. You can also use clear fishing line if you like a more clean look. These can be hung up as suncatchers, little home decor pieces or use them as Christmas ornaments during the holiday season.

If you enjoy painting on seashells or crafting with seashells…you’ll find over 150+ seashell craft projects right here on the Two Classy Chics blog! We will be sharing more seashell craft projects in the future too!

* This post contains affiliate links. If you make a purchase, we may or may not receive a small commission which helps to support this site. Thank you!

Hand Painted St. Patrick’s Day Shamrock Design Clam Shells Seashells

Hand Painted St. Patrick’s Day Shamrock Design Clam Shells Seashells

St. Patrick’s Day is just a few days away. You still have time to make these beautiful hand painted St. Patrick’s Day Shamrock Design seashells. The designs were painted onto 4″ to 5″ wide clam shells collected from the beach. You don’t need any patterns 

Superhero Themed Hand-Painted Clam Seashells Party Favors

Superhero Themed Hand-Painted Clam Seashells Party Favors

My grandson had a birthday a few months ago. The theme of his party was Superhero and we decided to make a few tabletop decorations and party favors to fit within that theme. These clam shells seashells were hand painted. The designs are really simple 

Hand Painted Spring Flowers Clam Shell Seashells Designs

Hand Painted Spring Flowers Clam Shell Seashells Designs

Hand Painted Spring Flowers Clam Shell Seashells DesignsIt’s time to get ready for some colorful spring decorating. This year I painted 6 colorful clam shells seashells to place in my flower garden. They add that nice pop of color until my spring flowers start blooming. Once they start blooming, I’ll be moving the painted clam shells to our back deck. You can use them to decorate inside or outside of your home. They make great gifts too!

** Post contains affiliate links.

Supplies Needed:

Large Clam Shells Seashells
Acrylic Craft Paints
Paint Brushes, Water Dish, Paper Towels
Acrylic Paint Markers
Clear Glossy Mod Podge Sealer
Foam Brush
Pencil

Hand Painted Spring Flowers Clam Shell Seashells Designs

Base coat each clam shell in your desired color. I used 2 coats of acrylic craft paint with 25-40 minutes of drying time between coats.

Use a pencil to lightly sketch a simple flower shape(s) onto the seashells. These don’t need to be overly-fancy. I started by sketching the inner irregular circle and then added heart-shaped or tear-dropped shaped petals. To keep things really easy I used BETEM Acrylic Paint Markers to color in the design. These markers are fantastic and have dual-tips (a medium and a fine tip). No priming is needed, no drippy messes and no foul paint odors. Plus, they dry quickly!!!

Hand Painted Spring Flowers Clam Shell Seashells Designs

You can paint one flower or multiple flowers. I didn’t add any type of foliage as I wanted a clean tropical looking flower that was colorful as my design. You can certainly get more creative! Let all of the paint dry for 2-3 hours or until no longer tacky.

Dip a foam paint brush into Clear Glossy Mod Podge Sealer and brush it across the entire painted surface of the seashell. Use a medium amount of the Mod Podge if you plan on displaying the shells outside…a lighter amount if you’re keeping them inside. After it has dried clear…flip the seashell over and seal the other side with the Mod Podge. This helps to protect the painted surface and helps the seashell from breaking down over time. That’s it, you’re done!

* This post contains affiliate links. If you make a purchase, we may or may not receive a small commission which helps to support this site. Thank you!
Shelly's Signature

Hand Painted Zoo Animals Seashell Designs

Hand Painted Zoo Animals Seashell Designs

Looking for an arts and crafts project to do with the kids? Love zoo animals? If so, check out these easy-to-make painted seashells! You’ll need a variety of clam shells, oyster shells and other type’s of seashells to make them. If you don’t live near 

Decoupage and Painted Sailboat Design Clam Shells Seashells

Decoupage and Painted Sailboat Design Clam Shells Seashells

I have a friend who is into sailboats. They love to get out on the open water to do some sailing. They like to compete in various races and participate in boating parades. Me…not so much. I sadly get motion sickness! Anyway, he asked me