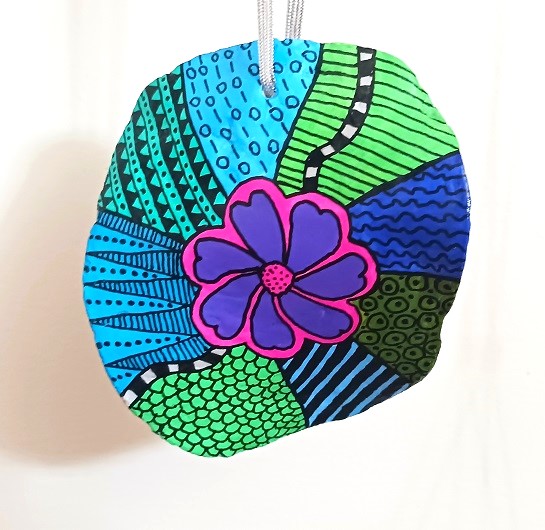
Zentangle is a popular art form that anyone can do. It's great for beginners and can be done in a wide variety of different surfaces. You can learn about the Zentangle art form by visiting one of the best websites HERE. You will also find great how-to videos over on YouTube. With that said...use the … [Read more...] about Hand Painted Capiz Shell Zentangle Design Suncatchers
Count Down to Christmas
Hand Painted Christmas Gnomes Clam Shells Seashell Designs

We're less than a month away from the Christmas holiday. If you haven't started your holiday crafting...it's time to get busy! Last week I painted these cute Gnome design seashells. The red, white and green Gnome designs will be used as place settings on our holiday table. Each guest has their name … [Read more...] about Hand Painted Christmas Gnomes Clam Shells Seashell Designs
Hand-Painted ANGEL themed Seashell Christmas Tree Ornaments

Love to decorate your home for the holidays with Angels? Looking to make a few homemade gifts? If so, we've got 3 Angel designs to share with you today. Two are Christmas Tree ornaments and one is a holiday decoration. All three of them are easy-to-make and you only need a few craft supplies to make … [Read more...] about Hand-Painted ANGEL themed Seashell Christmas Tree Ornaments
Painted Santa Claus Clam Shells Seashells for Christmas Gift-Giving

These adorable hand-painted Santa Claus seashells are super easy to make! You don't need any artistic talent to make them. In one weekend I was able to make 10 of them to give out as holiday gifts this year. You only need a few basic art supplies to make them. Let's get started. ** Affliate Links … [Read more...] about Painted Santa Claus Clam Shells Seashells for Christmas Gift-Giving
3 Easy-to-Make Snowman Seashell Christmas Tree Ornaments

Christmas is just around the corner. Every year I like to make several homemade Christmas tree ornaments to attach to gift packages that I'm giving out. They're great for decorating the box or bag and serves as an extra little gift for the recipient. These 3 snowman ornaments are made using … [Read more...] about 3 Easy-to-Make Snowman Seashell Christmas Tree Ornaments
Hand Painted Tropical Palm Tree Sand Dollar Christmas Ornaments

This year I'm going to be adding a handmade Christmas ornament to all of the gifts that I give out. They'll be attached to the outside of the gift bag or gift box. For my family and friends who love the beach and coastal life, I'm painting palm trees onto sand dollars. These coastal themed holiday … [Read more...] about Hand Painted Tropical Palm Tree Sand Dollar Christmas Ornaments
Christmas Holiday Gnome Wall Decoration Re-Do

Have you all seen the cute Christmas and Holiday wall decorations and decor at Dollar Tree? Oh my gosh, some of them are absolutely adorable! I love picking up holiday decor from Dollar Tree and bringing it home to use in various craft projects or just adding my own finishing touches to them to … [Read more...] about Christmas Holiday Gnome Wall Decoration Re-Do
Decoupage Large Seashells Christmas Dinner Place Settings

A few months ago I was at a local flea market and got a box full of vintage paper doilies in Christmas and holiday designs. They were round shaped doilies with scallop edges. Very pretty paper doilies and roughly 25 years old. I purchased the entire box full of 125 doilies for $1.00. Wow, what a … [Read more...] about Decoupage Large Seashells Christmas Dinner Place Settings