Tag: cleaning tips

A Step-By-Step Guide on How to Get Rid of Mildew Smell in Carpet

A Step-By-Step Guide on How to Get Rid of Mildew Smell in Carpet

With the average cost of carpet replacement ranging from $880 to $2,315, it’s no wonder homeowners who notice a musty smell start to stress out! If your home has suffered from water damage or a sub-par cleaning job and you’re left with a stinky smell, 

How to Clean Your Pet Carrier and Why You Should Keep it Clean

How to Clean Your Pet Carrier and Why You Should Keep it Clean

A year ago we became pet parents for the first time. In April 2019 we rescued and adopted an adult male cat. Then in December 2019 we rescued and adopted a small kitten. Over the course of a year we learned a lot about how 

Five Tips for Cleaning Your Radiators

Five Tips for Cleaning Your Radiators

Five Tips for Cleaning Your RadiatorsDoes it often seem like more dust gathers on your radiators than anywhere else? It’s ironic since they can be the hardest area of your home to clean. One look at all the pipes and trapped dust can make the idea of cleaning them seem daunting. Even the thinnest of vacuum attachments don’t seem to fit in the small gaps.

However, where there’s a will, there’s a way. These tips will help simplify the cleaning process and leave your radiators dust free and functioning to the fullest.

1. Get creative

While no one has invented a specific radiator cleaning tool, other household tools will do the trick. A bottle brush is a useful tool to get into those hard to reach spaces between the pipes of your cast iron radiators. If you don’t have a bottle brush, then there are other creative ways to DIY your own. Take any stick, or measuring stick and wrap a thin dust cloth around it, then secure with tape and voila.

2. Vacuum often

Although your vacuum attachments likely will not fit through all the areas of your radiator, it will still suck up any loose dust. It’s a good idea to get into the habit of running over the radiators quickly whenever you’re vacuuming your floors. It will help avoid extra build up and make your cleaning job more manageable.

3. Work from top to bottom

Using your tool of choice, work from the top of your radiator to the bottom. Insert it between the tubes at the top and slowly move it downwards, pushing the dust to the bottom of the radiator. If you have a panel radiator, without tubes, you can use your tool and press it into the slots on the top. The dust cloth should grab onto a lot of the dust, and the rest will fall out the bottom. It’s a good idea to put a towel of some sort underneath to collect the dust particles that will fall to the ground.

4. Use soapy water

The above step will help you remove the majority of loose dust that may have built up on your radiator. That said, there are always some stubborn bits that don’t want to let go. For this, you can use some warm, soapy water and a soft cloth to wipe clean. Use this cloth to give the exterior of your radiator a good wipe down. Avoid leaving it wet as it can encourage your radiator to rust a lot quicker.

5. Don’t forget the walls

Since there is constant heat coming up out of the radiator, dust and dirt often get pushed up with it. It can leave dust stuck onto the wall just about the radiator. It is usually a lot stickier than the loose dust that is on the radiator, and you’ll need to use your cloth to scrub it off.

Always make sure to turn off your radiator before doing any cleaning. Not only do you not want to burn yourself, but by moving the dirt around, you may create blockages if the radiator is still pulling heat through.

4 Reasons to Steam Clean Your Carpet Before the Holidays

4 Reasons to Steam Clean Your Carpet Before the Holidays

Almost 55 million Americans are planning to greet the holiday season by traveling, and most of those will be doing so via car. The average holiday trip is within 50-99 miles of home which means if you’re staying in for the holidays, you’ll likely have 

How to Tidy Up Your Bathroom Quickly

How to Tidy Up Your Bathroom Quickly

So, you just received a phone call from your friends and they have let you know that they are coming over in a few minutes. Your house looks clean, but your bathroom is a mess because you just have not made it a priority to 

How to Clean and Preserve Conch Shells

How to Clean and Preserve Conch Shells

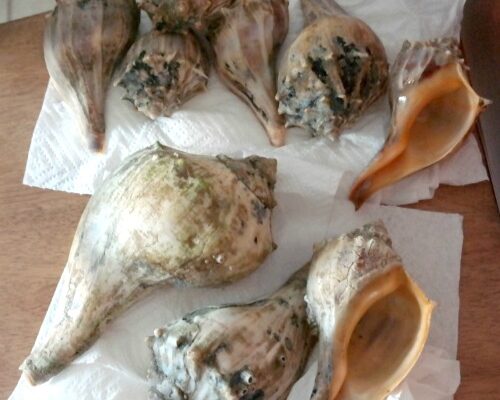
How to Clean and Preserve Conch ShellsI’ve been collecting seashells for over 40 years. I have all different type’s, sizes, and colors in my collection. If I had to estimate the number that I have…I would have to say 400 or more. Not only do I collect them…but I use them for home decorating and in various craft projects that I like to make. They’re beautiful treasures from the ocean once they’ve been cleaned up and preserved.

* This post contains affiliate links.

Today I wanted to talk to you all about how you can clean and preserve your Whelk and Conch Shells that you find lying around on the beach. When it comes to collecting, I recommend ONLY taking the shells that have been abandoned by the animal or if they animal is deceased. If you come across seashells that are still inhabited by a live animal…please put it back!!!

When there is a deceased animal inside you’ll have to clean out the shell before the animal starts to decay. I recommend doing this within a few hours of collecting the shell. If you wait for several days or until you get home from vacation the animal will rot and it will stink terribly. So, how do you clean Whelk and Conch Shells? Well, I’m going to tell you!

I like to fill up a large stock pot with hot water and bring it to a full boil. Place them into the water using tongs so that you don’t get splashed by hot water. Boil them for 10 full minutes (for medium to large shells) or for 5 minutes for small-sized ones.

How to Clean and Preserve Conch Shells

Using the tongs fish out your seashells and place them into a sink with cold running water. You need to cool them down so that you can handle them. Plus, the cold water will help to loosen the sand and debris that is sticking on the shell. Once its cool enough to handle you’ll want to use a sharp pronged fork to remove the deceased animal. You might have to rock the fork back and forth to dislodge the animal. Toss them away.

Note: Some people eat the meat but I ONLY recommend cooking and eating the meat from ones that you’ve caught with the animal still alive inside. You don’t want to cook them up and eat them when collecting the homes of the deceased. You can find info online on how to cook them up for human consumption.

How to Clean and Preserve Conch Shells

After the animal has been removed you’ll want to wash out the inside of the seashell with cool running water. It may feel gritty or slimy. Keep rinsing until it feels clean. You’ll want to lay them out to air dry. Once dry…package them up for the trip home. I like to wrap them in beach towels, old wash cloths, stuff them into socks, wrapped in paper towels, bubble wrap, etc. Never wrap them in newspaper as the ink will stain them!!!

You need to clean them one more time! For the final cleaning you’ll fill up your kitchen sink with hot, soapy water. I recommend using Dawn Dish Liquid which is the BEST for removing dirt, debris, grease, oil, etc. Let them soak in the soapy water for 15-20 minutes. Drain and rinse with cool water.

Next you’ll want to get them looking pretty. I like to use a Mr. Clean Magic Eraser to remove stuck on debris, algae, barnacles, etc. Rub the eraser with the grain of the shell if it has ridges. It should remove the debris. If not, you may need to GENTLY use an SOS Soap Pad. Again, be gentle and rub with the grain of the shell. Rinse thoroughly with water until they’re clean inside and out!!!  Lay them out to thoroughly dry.

Once they’re dry you’ll want to preserve them. I like to spray mine with two coasts of a clear acrylic spray sealer. If I’m going to be using them indoors I’ll spray them with one coat and if I’m going to be displaying them outdoors I’ll give them two heavy coats of the clear spray sealer. You can choose if you want to use one with a matte or glossy finish. Let them dry for 1-2 days before displaying them. That’s it, you’re done!!!

Here are some additional tips:

1. If the seashell is vacant…I still recommend that you place it into boiling water for 3-4 minutes to kill any germs, molds, algae, etc. that may be on it. Remove from the pan and rinse them under cold running water. Then continue with the rest of the steps to clean it.

2. In regards to tools that you’ll need: A large cooking pot, tongs, sharp-pronged fork, slotted spoon (if dealing with small seashells), Dawn Dish Liquid, Mr. Clean Magic Eraser, SOS Pads, Old Toothbrush (for scrubbing small spaces), Paper Towels, Cotton Towels, etc. I keep my supplies packed inside a large cooking pot, so that things are stored together.

3. If you’re unsure if an animal is alive or deceased…it’s best to put it back or spend a few minutes observing it to see if it moves. Again, I recommend only taking the shells that have been abandoned or ones that have a deceased animal inside.

4. Wash your hands several times when handling them. You don’t want to spread germs around and clean-up the area as soon as you’re done with a good cleaning solution.

5. Invest in a good Seashell Collecting Guide to help you identify your treasures. You can check out one of my previous posts to see which one I recommend for North American Seashells.

6. If you would like some ideas on how you can decorate your home and if you’re looking for seashell craft projects to make…you’ll find hundreds of them RIGHT HERE on our blog!

* This post contains affiliate links. If you make a purchase, we may or may not receive a small commission which helps to support this site. Thank you!

Shelly's Signature

Rust in Bathtub, Toilets, and Sinks: A DIY Guide on How to Remove It

Rust in Bathtub, Toilets, and Sinks: A DIY Guide on How to Remove It

Rust isn’t dangerous, but it sure can be annoying when it stains all your bathroom appliances. If you have the right tools and know-how, removing rust in bathtubs, toilets, and sinks isn’t hard. But it does take some patience. We’ve put together this guide to 

A New Book to Help You Declutter Your Home and Life the Feng Shui Way

A New Book to Help You Declutter Your Home and Life the Feng Shui Way

If you want to free yourself from clutter, you may be interested in a new book called 10-Minute Declutter: Hundreds of Tips to Organize Every Room of Your House by Skye Alexander (Fair Winds Press/Quarto Group, September 2019). This decluttering book takes an unusual approach,