Author: Shelly

Summertime Fun in the Backyard Swimming Pool

Summertime Fun in the Backyard Swimming Pool

Five years ago we made the decision to get a swimming pool in our backyard. At the time…we wanted an in-ground pool but that wasn’t possible with our septic system and well water. After learning that, we opted to go with an above ground pool 

Painted Rubber Duckie, Fish and Flamingo Clam Seashells Party Favors

Painted Rubber Duckie, Fish and Flamingo Clam Seashells Party Favors

Have you heard of the Cruising Ducks? They’re ducks that passengers hide while on the cruise ship for others to find. This craft project combines that along with painted seashells to make these adorable summer themed party favors. I think they’re adorable and perfect for 

Home Canning Beef Vegetable Soup Recipe with Tips

Home Canning Beef Vegetable Soup Recipe with Tips

Home Canning Beef Vegetable Soup Recipe with TipsTwice a year I home can a big batch of beef vegetable soup for my family to enjoy. This recipe is for your classic red sauce veggie soup but instead of using expensive chunks of beef, I use lean ground beef. You can play around with the spices to get the exact flavor that you prefer. Once it’s been properly processed and canned…it will keep for 12-18 months in your pantry. You’ll need a pressure canner and your standard home canning supplies.

** This post contains affiliate links.

Home Canning Beef Vegetable Soup Recipe

3-4 lbs. lean ground beef
2 cups onions, finely chopped
1/2 cup green bell pepper, finely chopped
1/2 cup red bell pepper, finely chopped
1 1/2 cups celery, finely chopped
6 cups peeled and diced white potatoes
6 cups carrots, thinly sliced
2 cups lima beans
2 cups green beans
4 cups whole kernel corn
2 cups peas
8 cups tomato sauce
2-3 cups stewed tomatoes
3 tbsp. basil
2 tbsp. oregano
2 tbsp. parsley
2 tsp. salt
1 tsp. ground black pepper
1 tsp. red pepper flakes
water

In a large skillet fry up the lean ground beef along with the finely chopped onions and chopped peppers until done. Drain off the grease.

You’ll need a large stock pot for the rest of the recipe. Pour the ground beef mixture into the pot. Then start adding all of the above ingredients including the spices stirring after each addition. If the mixture seems too thick you can add additional tomato sauce or a little bit of water. You want to get it to the correct consistency.

Cover the stock pot and simmer over low-to-medium heat for 2 hours, stirring every 30-45 minutes. You want to get everything cooked and thoroughly heated through…from top to bottom of the pot. Once it’s cooked…taste test it. If you want to add additional seasonings add them now and simmer for an additional 10-15 minutes. Reduce heat to low.

Home Canning Beef Vegetable Soup Recipe with Tips

Home Canning the Beef Vegetale Soup

Prepare the pressure canner, glass mason jars, seals, wide-mouth funnel, jar lifter, spoons, etc. for the home canning process. Make sure everything is clean and dry.

Place 2-3″ of water into the base of the pressure canner. Turn heat on medium to get it simmering but not boiling hot.

Ladle the hot soup into hot jars leaving 1″ headspace at the top. Remove the air bubbles and adjust headspace if necessary. Wipe the rim of the jar with a clean cloth. Center the seal on top of the jar and then screw on the ring…just until it’s fingertip tight.

Place the jar immediately into the prepared pressure canner. Continue filling all of the glass mason jars in this manner. Place the lid onto the pressure canner and lock. Bring to a boil over medium to high heat. Vent steam for 10 minutes, then close the vent. Continue heating to achieve 10 lbs. pressure.

Process pint jars for 55 minutes or quart sized jars for 85 minutes.

Turn off the heat. Let pressure return to zero naturally. This can take 20-40 minutes so be patient. Once it reaches zero, wait for 5 additional minutes. Open the vent. Unlock the lid and remove it. Let the mason jars sit for an additionl 10 minutes in the pressure canner.

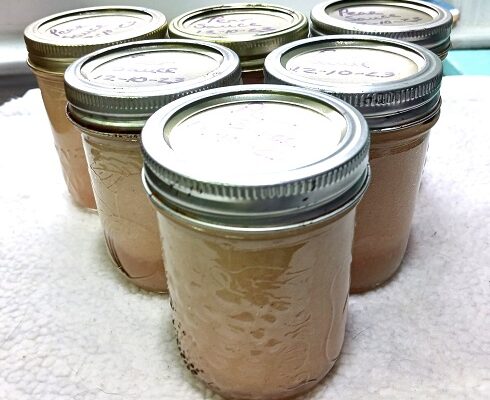
I lay a clean dry towel out on my kitchen counter-top. Carefully remove the mason jars from the pressure canner and place onto the towel. They need to be in a non-drafty area. Let them fully cool to room temperature. Label the jars with contents and date. They’re now ready to be stored in your pantry.

Variations and Tips

You can alter the type’s of vegetables to your liking. My family likes a lot of corn and lima beans in their vegetable soup. Just make sure you get the entire “cup volume” correct when preparing it. You can tailor the seasonings (spices) to your own liking. My mother adds 1/8 cup of granulated sugar to the recipe when she makes it. She likes her soup a tad sweet. We used lean ground beef but you can certainly cook up a beef roast and shred it for the recipe.

* This post contains affiliate links. If you make a purchase, we may or may not receive a small commission which helps to support this site. Thank you!

How to Use Natural Fiber Mulberry Paper to Decoupage Seashells

How to Use Natural Fiber Mulberry Paper to Decoupage Seashells

Love decorating clam shells and seashells? If so, check out these pretty designs that we made using handmade Mulberry Paper which was then decoupaged onto the seashells. The mulberry paper is semi-sheer, pliable and easy to work with. It doesn’t wrinkle like paper napkins, so 

Awesome Flea Market Find – Sand Dollars

Awesome Flea Market Find – Sand Dollars

My husband and I went to the Flea Market last weekend. We try to go 3-4 times throughout the summer. It’s a 25 minute drive from our home but is one of the largest Flea Markets in Central Pennsylvania. It’s held at William’s Grove. When 

Home Canning Mixed Vegetables with Recipe and Tips

Home Canning Mixed Vegetables with Recipe and Tips

Country-Style Mixed Vegetables RecipeOur backyard garden has done really well this year. I’ve been picking a lot of fresh vegetables every week. Sometimes I have enough to can a full load of whatever it is that I harvested. At other times…I have a little bit of this and that which I toss together to make mixed vegetables. Here’s the recipe that I recently used to make mixed vegetables. It utilizes carrots, corn, green beans, zucchini and bell peppers.

** Post contains affiliate links.

The recipe will yield approximately 6 pint jars. You’ll need to process the jars in a pressure steam canner. I bought mine from Amazon for a really great price. I use it several times a week during the growing season. You’ll need at least 6 glass pint size mason jars.

Country-Style Mixed Vegetables Recipe

3 1/2 cups carrots, sliced into rounds or diced
3 1/2 cups whole kernel corn
3 1/2 cups greens beans, chopped into pieces
3 cups zucchini, peeled and chopped into cubes
1 cup green or red bell pepper, chopped into pieces
salt
water

Prep all of your vegetables as listed above. Make sure you measure them out as you want the portions to be accurate or close to accurate as you can get.

Country-Style Mixed Vegetables Recipe for Home Canning

Combine all of the vegetables into a large pan. Add water to cover the vegetables. Bring the mixture to a boil. Reduce heat to a simmer and simmer for 5 minutes.

Pack the vegetables and liquid into a pint size glass mason jar leaving 1″ headspace at the top. Remove air bubbles. Wipe the jar rim with a clean cloth, add the seal and ring just until it’s fingertip tight. Place jar on the rack in the pressure canner containing 2″ of simmering hot water. Repeat until all jars are filled.

Place the lid on the pressure steam canner. Lock it into place. Adjust heat to medium-high. Vent steam for 10 minutes. Bring the pressure up to 10 lbs (psi). Process the pint jars for 1 hour and 15 minutes. Turn off the heat and let the canner cool down until it reaches 0 ZERO pressure. Once it reaches 0 set a timer for 5 minutes. Then remove the lid. Let the hot jars sit inside the canner (lid off) for an additional 10-15 minutes before carefully removing them to cool on the countertop. Label and date.

* This post contains affiliate links. If you make a purchase, we may or may not receive a small commission which helps to support this site. Thank you!

Hand Painted M & M Candy Clam Shells Seashells

Hand Painted M & M Candy Clam Shells Seashells

These hand painted M & M Candy themed seashells are super cute and easy-to-make. We painted  dozen of them to use as little party favors at my nephews birthday party. You’ll need 2 1/2″ to 3 1/2″ wide clam shells collected from the beach, acrylic 

Painting Kindness Rocks – 5 Easy Designs

Painting Kindness Rocks – 5 Easy Designs

Our family enjoys getting together to paint rocks and seashells for the Kindness Rocks Project. You can check out their official website to learn all about them. It’s a great way to spend time together as a family working on an arts and craft project.