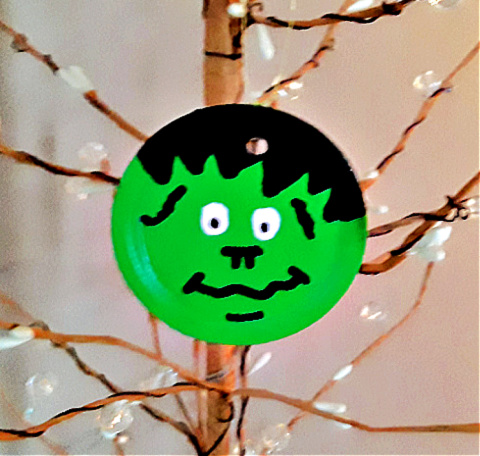
 Halloween is just around the corner and these adorable Frankenstein painted soup can lid ornaments are just the craft project to keep the kids (or adults) busy! You can make several of them in just a weekend with clean soup can lids, acrylic paints and a few other craft supplies. Once completed you can hang them outside off of your bushes and trees or hang them up inside as party decor.
* This post contains affiliate links.
When working with soup can lids you want to use a can opener that unseals the lid from the can. Never use one that cuts off the lid and gives you a jagged edge. Use a newer style can opener to unseal the can and you’ll have a smooth edge around the entire lid. Hand wash them with warm, soapy water and towel dry. You can use metal mason jar lids too!
Frankenstein Painted Soup Can Lid Ornaments
Metal Soup Can Lids
Drill with Drill Bit
Acrylic Craft Paint: Medium Neon Green, Black and White
Paint Brush, Water Dish, Paper Towels
Clear Acrylic Spray Sealer, Glossy Finish
Clear Fishing Line
Scissors
You’ll want to protect your work surface with a piece of drop cloth, an old plastic placemat or a sheet of aluminum foil. Have an adult use a drill with a drill bit to make a hole at the top of the lid. This will allow you to hang them up after they’ve been painted.
Base coat the front and back of the lid with two coats of medium neon green acrylic paint, allowing 30-45 minutes of drying time between coats.
Using black acrylic paint make a zig-zag hairline and hair for the Frankenstein as shown in the photograph. It should look a tad sloppy and off-kilter as he’s not to look handsome! Using white paint make two oval shaped eyes. With the black paint you’ll want to add the nose, mouth, chin and two black scars near his eyes. Once the white paint is dry add the black inner pupils. Let everything dry until paint is no longer tacky.
Take them outside and spray each side of the lid with two light coats of clear acrylic spray sealer. We like the glossy finish which gives them a nice shine. Let dry.
Cut a 8″ to 10″ piece of clear fishing line. Thread it through the hole and knot the two ends together to make a hanging loop. Use scissors to trim the ends if needed. That’s it…you’re done!
Painting Tips: Don’t want to mess with acrylic paints? Working with young kids? Have an adult do the neon green base coat and let dry. Then give the kids Sharpie Markers or Acrylic Paint Pens to add all of the facial features.
* This post contains affiliate links. If you make a purchase, we may or may not receive a small commission which helps to support this site. Thank you!


I agree that your idea of painting them ahead for the kids is a great tip. This is a very cute Halloween craft.
I always enjoy seeing your clever ideas. I love to paint and this looks like a fun craft idea for Halloween thanks for sharing.
I have ever thing to make these. I like your tip of painting them ahead for the kids. I have noticed that my great niece does not like to wait for things to dry.
I think these are so cute. I can’t wait for the girls to make some. Thank you for another great idea.