• Skip to main content
  • Skip to secondary menu
  • Skip to primary sidebar
  • Skip to footer

The Classy Chics

Classy and Opinionated Lifestyle Mom Blog

  • Home
  • Contact Me
  • Reviews + Giveaways
    • The ClassyChics Team
    • Privacy | Disclosure
    • Official Site Rules
    • The Media Kit
  • Brand Affiliations
    • Brand Affiliations – Brand Ambassadors
  • Recipe Box
  • Books + Movies
  • Crafts
  • Health and Wellness
  • Beauty
  • Travel + Entertainment
  • Cleaning + Organizing
  • Articles
You are here: Home / Crafts and Hobbies / Lavender Flowers Rub on Transfers for Craft Projects

Lavender Flowers Rub on Transfers for Craft Projects

July 28, 2026 by Classystaff Leave a Comment

Looking for a fun and easy to make arts and craft project? If so, you’ll love this one! You’ll need your desired surface (seashells, rocks, ceramic tiles, wood, etc.), some acrylic craft paint, rub-on transfers, clear sealer and a few other basic supplies. For this project, I chose to use medium and large clam shells that I collected from a beach. 

** Post contains affiliate links.

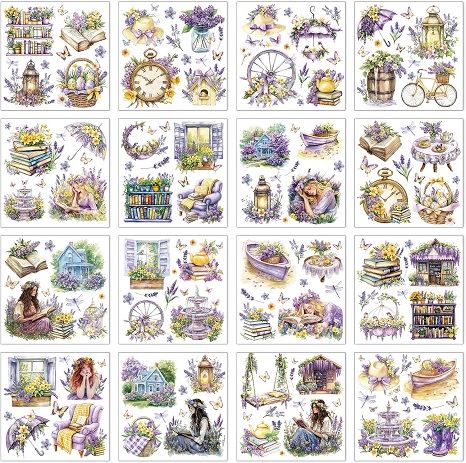
I fell in-love with the Lavender Flowers Rub on Transfers Pack that I purchased from Amazon. It was under $10 and you get 16 sheets with various transfers on them. You simply cut-out the desired design. Remove the backing paper and place the transfer down onto your surface. Use a popsicle stick to rub it on. Once it’s on…peel off the clear topper sheet. Yes, they’re that easy to use and will give you beautiful results! There are plenty of rub-on transfers for you to use to make various projects. Beautiful designs! 
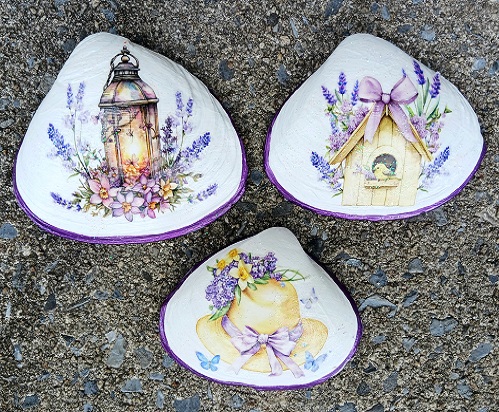
When working with seashells I do recommend that you base coat each shell with 2 light coats of white acrylic craft paint or your desired background color. Let the paint thoroughly dry until it’s no longer tacky. Once it’s dry…you can apply a transfer on top. If you want to write wordage onto the shell or trim out the edges in a color…I recommend that you use a pack of Acrylic Paint Markers to keep the project quick and easy.

After you have all of the design work done you need to seal it. You can spray on a Clear Acrylic Sealer or brush-on some clear Mod Podge. Let them thoroughly dry overnight. 

Disclosure: This post contains affiliate links.

Filed Under: Crafts and Hobbies Tagged With: arts and crafts, craft projects

Reader Interactions

Leave a Reply Cancel reply

Your email address will not be published. Required fields are marked *

Primary Sidebar

Follow Us

Enter the Giveaways

**Note: Those Marked with a ** are Open To US and Canada


4-04 The Very Hungry Caterpillar Matching Game from Briarpatch


5-02 I LOVE Blueberries! Children’s Book with 2 Winners

**Note: Those Marked with a ** are Open To US and Canada

Our Daily Posts Via RSS Feed

Click the button to Sign Up - Choose your favorite Reader- For Email Delivery twoclassychics

Search Our Content

Explore Our Content

  • Articles
  • Babies and Children
  • Bath and Body Products
  • Beauty
  • Books and Movies
  • Brand Ambassadors
  • Business Tips
  • Cleaning and Organizing
  • Cleaning Products & Tips
  • Crafts and Hobbies
  • Electronics
  • Fashion
  • Fitness Products and Tips
  • Food and Recipes
  • Frugal Tips
  • Gardening Products and Tips
  • Gift Ideas
  • Giveaways
  • Health and Wellness
  • Holiday Gifts
  • Home Decor | Housewares | Linens
  • Home Improvement Products and Tips
  • Jewelry
  • Kitchen Products
  • Lighting | Candle Products
  • Men's Products
  • Our Ramblings
  • Outdoor Sports and Hobbies
  • Pet Products and Tips
  • Preview Sunday
  • Product Reviews
  • Purses | Handbags | Accessories
  • Skincare Products and Tips
  • Toys | Games
  • Travel and Entertainment
  • Women's Clothing | Men's Clothing | Footwear


Footer

Stats and Affliations

Page Ranking Tool

Blogroll

  • Passionate About Crafting
  • Pennsylvania & Beyond Travel Blog
  • Shakin 'N Bakin Foodie Blog
  • Terms of Service – Privacy Policy

Archives

Categories

The Classy Chics
© 2006–2026