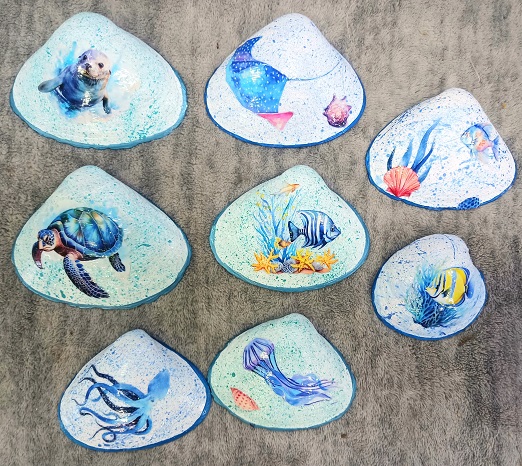
Two weeks ago I sat down and painted medium to large sized clam shells and then decorated them with rub-on transfers that I had purchased from Amazon. The seashells turned out beautifully! I’ll be using a few as summer decor on our back deck and around our swimming pool. Others will be given away to family and friends. You could use smooth river rocks or ceramic tiles if you don’t have access to clam shells.
Check out our TCC blog for HUNDREDS of free arts and crafts ideas using seashells!
** Post contains affiliate links.
Wash all seashells with warm soapy water. I like to use Dawn Liquid Dish Soap. Why Dawn? It does a great job at removing dirt, debris, grime and fishy odors. Rinse with clean water. Let them air dry overnight. If you have any stubborn areas that need to be cleaned…use one of those Mr. Clean Magic Erasers, it should come right off.
Base coat all of the clam shells with white acrylic craft paint and a paint brush. If you want to save time, you could use white spray paint. You should ONLY need one coat to get the coverage that you need. Let dry.
Paint Splatter Technique – This can be a little messy. You’ll need an old toothbrush and your desired paint colors. I like to do this over my large kitchen sink as it can make a mess. I find that I get the best paint splatter effect by dipping my toothbrush into some water first. Let the excess water drip off before you dip it into your desired paint color. Run your finger over the bristles of the toothbrush to get the paint to splatter onto the clam shell. You can do one color or multiple colors. If you look closely at my designs…some were splattered with blue, some with aqua and some with both colors combined. Let the clam shells dry.
Rub-On Transfers – I purchased a pack of Marine Animal rub-on transfers from Amazon. They have hundreds of different designs you can choose from…including holiday. Use scissors to cut around the transfer that you want to use. Pull the backing sheet off. Place the transfer onto the clam shell. Use a popsicle stick to rub it onto the surface of the shell. You want to be gentle so that you don’t rip the transfer. Pull the remaining top sheet off. Use just your finger to smooth it out if needed.
I used a pack of Acrylic Paint Markers with a Metallic Finish to trim out the edges on each clam shell. I used blue and dark turquoise metallic colors. I think it finishes off the edges nicely and really makes them pop! You can use regular acrylic craft paint & a brush or skip this all together.
Clear Top Coat Sealer – To protect the design you need to apply a clear top coat sealer. You can use a Clear Acrylic Spray-On Sealer or use a foam brush and brush-on Clear Mod Podge Sealer. I personally like using the Mod Podge. It goes on white but dries crystal clear. I use the one with a glossy finish. Let them dry overnight.
That’s it, you’re done! You can display your new handmade treasures inside or outside of your home. They make great backyard bbq table-top decorations, around the swimming pool, etc. They’re fun and beautiful to look at!
Leave a Reply