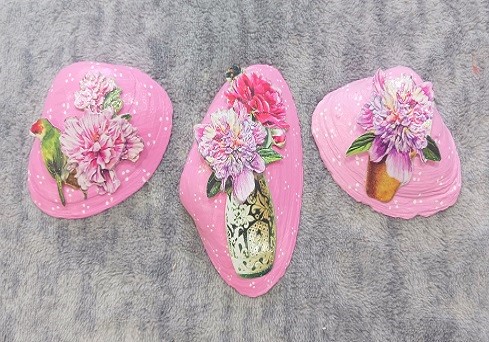
 Looking to start painting kindness rocks or kindness seashells? Looking to add some color to your spring home decor? What about adding some pretty little pieces to your yard and garden art collection? These gorgeous hand painted clam shells can be used in a variety of different ways! I’m using them as table decor for a tea party that I’m hosting for a few friends. After the party…my guests can take them home.
** This post contains affiliate links.
This is a great arts and craft project for beginners. You’ll need a few basic art and craft supplies which are listed below.
3-5″ wide Clam Shells, Seashells
Acrylic Craft Paint
Paint Brush, Water Dish, Paper Towels
3-D Stickers Embellishments
Foam Brush
Clear Mod Podge Sealer, Glossy Finish
Gorilla Glue
Clothespins or Small Clamps
Base coat all of the seashells with acrylic craft paint in a color that will coordinate with the 3-D sticker embellishments that you selected. I went with a pink color. I applied two coats of paint to each seashell so that I got the coverage that I needed. Let dry for 1-2 hours or until the paint is no longer tacky.
You can buy 3-D Sticker Embellishments in the scrapbooking section at your local craft store or from Amazon.
Remove the sticker from the sheet. Carefully apply a tad of Gorilla Glue onto the back of the sticker, being careful to NOT get it onto your hands. Press it down onto the shell. Use clothespins or small clamps to hold it into place for about an hour. Regular sticker glue that is on the back of the stickers doesn’t adhere them nicely onto the shell, hence the use of Gorilla Glue. Remove the clothespins.
Dip the end of a paint brush into white acrylic craft paint or use a wooden toothpick. Dot on tiny little white dots to add interest to the background color (the pink areas) of the shells. Let dry for about 20 minutes or so.
To apply the Mod Podge Clear Sealer I like to use a foam brush. Dip it into the Mod Podge and generously brush it across the entire seashell…including over-the-top of the stickers. This will seal the paint and help to protect the pretty stickers that you applied. Let them dry for 3-4 hours.
You can sign and date them on the back side or write meaningful messages onto them using a fine point black Sharpie Marker.
Leave a Reply