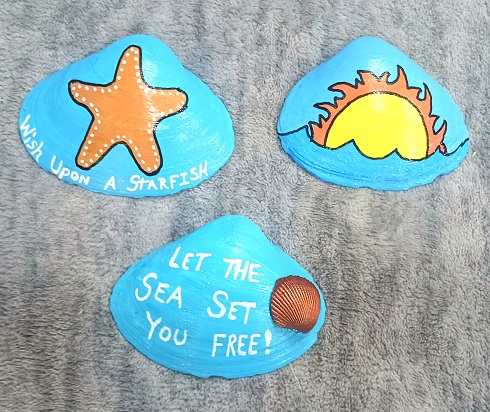
 Heading to the beach for vacation? Were you on vacation and brought home some clam shells? Live there? Lucky you! Here are 3 easy to make painted beach vacation designs that you can whip up this weekend! All designs were painted on medium sized clam shells collected from the beach. Enjoy painting seashells? Like to make beach crafts? Check out all of the 300+ craft projects on our blog!
** Post contains affiliate links.
Wash all seashells in warm soapy water using Dawn Liquid Dish Soap. Why Dawn? It does the best job at removing sand, debris and fishy odors. Rinse with clean water. Let them air dry overnight.
Base coat the shells with 2 coats of acrylic craft paint in your desired colors. I worked with a pretty ocean blue color. Let them fully dry. Now the fun part…decorating them!!!!
I used a set of BETEM Acrylic Paint Markers that I purchased from Amazon. They have dual-ended tips. They don’t require any priming, no clogged tips, no leaky messes and no foul paint odors. You can do any type of beach design you want. I kept them very simple as that’s what I like! You can copy my designs or use them to inspire your own. Use the paint markers to paint your design onto the background.
Here’s a tip: If you want to glue jewels, charms, baubles, other seashells, etc. onto your shell you need to use Gorilla Glue. Don’t use hot glue as they will fall off. Use something that gives you a stronger bond like the Gorilla Glue.
Once all of the design work has dried it’s time to seal the painted design. I used a foam brush and applied a generous coat of Clear Mod Podge Sealer across the entire top of the seashell. If you want glitter, you need to sprinkle the glitter on while the Mod Podge is still wet. It goes on white but will dry crystal clear. Let them dry overnight.