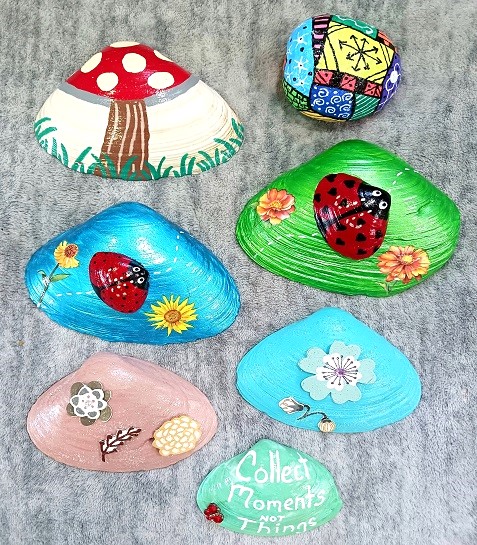
Hand Painted Spring Designs Clam Shells and Seashells
I love decorating my flower beds, front porch, back deck and around our swimming pool with seasonal yard art. It’s a great way to add flair and a pop of color to those areas. Last month I made several hand painted clam shells with a SPRING THEME to decorate until summertime arrives. All of these designs are easy-to-make with no pattern or template needed. Great for beginners!
If you enjoy painting on seashells or crafting with seashells…you’ll find over 150+ seashell craft projects right here on the Two Classy Chics blog! We will be sharing more seashell craft projects in the future too!
** Post may contain affiliate links.
For this craft project I collected 1″ to 5″ wide clam shells from the beach. Wash them in warm soapy water using Dawn Liquid Dish Soap. Why Dawn? It does the best job at removing sand, debris and fishy odors. Rinse with clean water. Lay them out on a towel to air dry overnight.
Base coat all of the seashells with 1-2 light coats of white acrylic craft paint. Allow to dry. Base coating helps the colors that you apply on top to really POP!!!
If you’re making the ladybug design you’ll need 1″ to 1 1/2″ wide clam shells to make the lady bug. Paint the shell with a solid red color. Once it has dried go back over it with a BETEM Black Acrylic Paint Marker to make the head, separation of wings and the polka dots. Use a white acrylic paint marker to add the eyes.
Working with metallic paint colors is a lot of fun but they do take a lot longer to dry. I painted one of the large clam shells a metallic blue and one a metallic green. I appled rub-on transfers in a flower design onto each seashell. I then used Gorilla Glue to attach the painted ladybug on top. Let everything dry overnight. The next day you want to lightly spray them with a Clear Acrylic Spray Sealer (outside) and let dry for a few hours. This protects the paint.
Look at my photograph to see some of the other designs. The floral shells were made by applying 3-dimensional stickers on top. I used Gorilla Glue to adhere them to the seashell to affix them permenantly to the shell. I brushed 2 light coats of Clear Mod Podge Sealer over-the-top of the shell to protect the paint. It goes on white but dries crystal clear.
To make the mushroom design I did that free-handed by using a pack of BETEM Acrylic Paint Markers. Base coat the clam shell first and then do all of the design work on top. You can then seal it with a spray-on or brush-on clear sealer.
* This post contains affiliate links. If you make a purchase, we may or may not receive a small commission which helps to support this site. Thank you!
