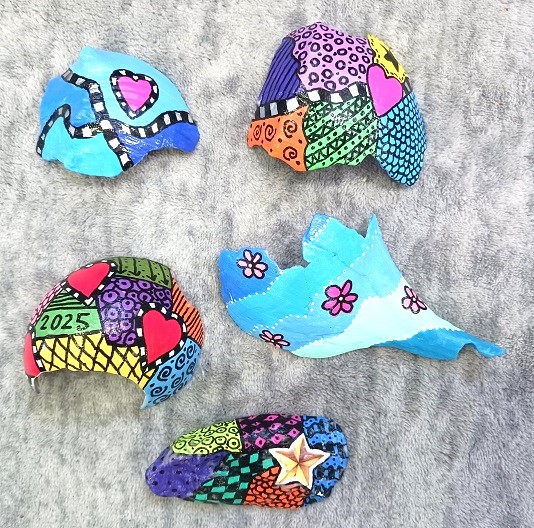
Turn Broken Seashells into Beautiful Painted Works of Art
 When walking the beach I see a lot of people just walk by the broken seashells not giving them a second look. Personally, I see beauty in broken shells and love to collect them for my various art and craft projects. The broken shells you see in my photograph are pieces of whelk shells, large moon snail shells and a chipped up oyster shell. After I’ve painted them, you can barely recognize that they were once broken seashells!
If you enjoy painting on seashells or crafting with seashells…you’ll find over 175+ seashell craft projects right here on the Two Classy Chics blog! We will be sharing more seashell craft projects in the future too!
** Post contains affiliate links.
Collect the broken shells. Once home you want to wash all of them in hot soapy water using Dawn Liquid Dish Soap. It does the best job at removing sand, debris and fishy odors. Rinse with clean water. Let them air dry overnight.
Lay a plastic drop cloth or plastic bag down outside. Spray them with a flat white spray paint. Don’t use a spray paint that has a semi-gloss or glossy finish. It needs to be FLAT. Spray each side 1-2 times with light coats of white paint to serve as the base coat. This will help the colors “pop” once applied on the top…plus make for a nicer painting surface.
You can decorate and paint them in whatever style appeals to you. You can totally free-hand your design or lightly sketch it on the top using a pencil. I did a Zentangle design on 3 of the broken shells and just a simple design on the other two. You don’t need to be a professional artist to make these!
Last month I painted several in solid colors and then went back and wrote inspirational words and quotes on them. They were a gift for a friend who has them displayed in a basket on her desk.
If you want to keep the painting and design work simple…skip the paint brush and use BETEM Acrylic Paint Markers and Tooli-Art Paint Markers to color-in and outline your designs. I used both sets when designing these and I love how they turned out.
Let all of the paint dry. Once dry you need to seal the painted design by brushing on 1-2 light coats of Clear Mod Podge Sealer. It goes on white but dries crystal clear. It will protect the paint from chips, cracks and will help to keep the colors bright and vivid. Let dry overnight.
* This post contains affiliate links. If you make a purchase, we may or may not receive a small commission which helps to support this site. Thank you!