Kid’s Crafts – How to Make Potato Stamps
 Twice a month I enjoy sitting down with my grandchildren to work on art and craft projects. We will spend 2-3 hours whipping up a project and always have a great time doing it. When it comes to crafting with kids you don’t have to spend a lot of money doing it. Many times I use scraps from my craft room, things found in nature or household items that I no longer need or use. Young kids aren’t picky!
* This project contains affiliate links.
You can easily make your own potato stamps and let the kids create artwork with paint, markers and paper. We will use the smaller potatoes in our bag or potatoes that are starting to get soft when we do this project. An adult will need to make the potato stamp and then let the kids go-to-town making their artwork.
How to Make Potato Stamps
Small to Medium Sized Potatoes
Knife and Cutting Board
Metal Cookie Cutters
Tempra Paint
Markers
Heavy-Duty Paper (suitable for painting)
Paper Towels
Water Dish
Foam Plates or Plastic Butter Dish Lids
Have an adult cut the potato in half. You can get two stamps per potato. Have an adult cut the desired shape into the sliced end of the potato by using a knife. You can also push a metal cookie cutter into the sliced end of the potato and cut around it. Stars, circles, squares, basic flower shapes, etc. work well. Stay away from very detailed cookie cutters with a lot of nooks and crannies.
Squirt the tempra paint onto a foam plate or onto a plastic butter dish lid. Have the child dip the potato stamp into the paint. If they want to change colors using the same stamp: Wet a paper towel in water (the water dish), use paper towel to wipe the paint off of the stamp before dipping it into a new color.
Tempra paint dries pretty quickly. Our’s was dry within 30 minutes but we didn’t stamp HEAVY amounts of paint onto the paper. Once it’s dry the kids can further embellish their artwork with markers or paint pens. Let dry.
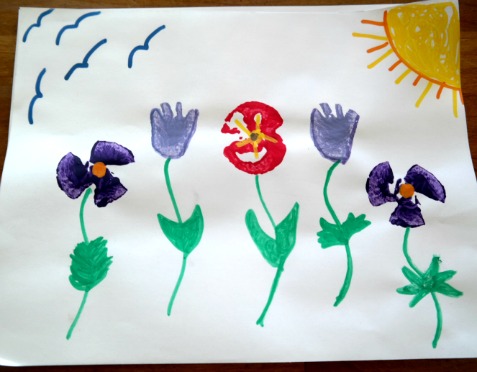
My 11 year old granddaughter made the artwork shown in the photo. She used potato stamps to make the heads of each flower. She used markers to make the stems, leaves, the sun and the birds flying above. She added a little bit of an additional touch to each flower’s center with a marker.
* This post contains affiliate links. If you make a purchase, we may or may not receive a small commission which helps to support this site. Thank you!
