 Twice a year my mother and I get together and make big batches of homemade seasoned dry bread crumbs. Throughout the year we freeze all of our bread that is starting to get stale, left-over crusts from bread, rolls and even bagels! On top of that…one of our local bakery outlets will put day old bread & rolls on clearance and we pick those up too! Once we both have accumulated a large stock of frozen leftover bread…we get together for our bi-annual bread crumb making party!
Today…I’m going to share with you how we make our own homemade seasoned dry bread crumbs. Here is what you’ll need to get started.
Food Dehydrator
Seasonings
Bread, Rolls, Bagels
Blender
Sharp Bread Knife and Cutting Board
Plastic Containers or Mason Jars
Large Plastic Spoon and Ladle
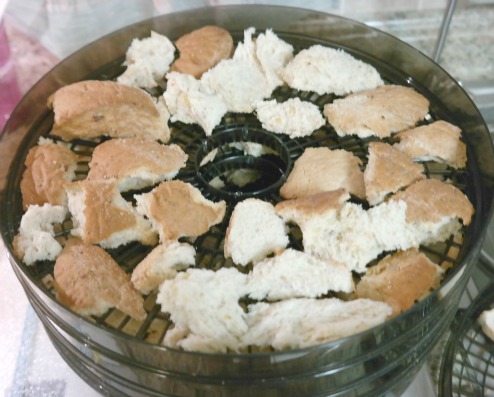
I use a 5-tray food dehydrator from Ronco that I picked up at the Flea Market a few years ago for $2.00. Plug it in and set it on low. You can lay single slices of bread directly on the trays. I advise you to rip a part your artisan breads and rolls or cut them into small pieces or slices.

Lay all of your slices and pieces onto the trays in a single layer. You want to allow a little bit of space between them all so that the hot air will circulate around them. Stack the trays onto one another, open the vents on your lid and walk away.
Your bread & rolls need to completely dry out…absolutely NO moisture left in them. This process for me takes 6-8 hours, so try doing this before you go to bed or first thing when you get up in the morning. Once your bread is completed dried out…move on to the next steps.

I remove the pieces from the tray and smash them up with my hands & fingers and place them into a large bowl. I like my pieces to be less than 2″ in size before I put them into my blender. I then fill my blender container halfway full with the bread pieces.

Before I turn the blender on…I like to add my dry seasonings/spices. Everyone has their own taste preferences but I like to add the following per blender batch:
1/2 tsp. Spike 5 Herb Seasoning
1/2 tsp. Dried Oregano
1/2 tsp. Dried Basil Leaves
1/2 tsp. Dried Parsley
1/4 tsp. Lawry’s Seasoned Salt
Turn your blender on medium and blend until all of your bread chunks are the consistency of coarse or fine bread crumbs. We like our’s of a fine consistency which is perfect for using in most of my recipes. Once done…pour them into a large plastic container and repeat until all of your bread is done.

I then use a ladle and ladle my seasoned dry bread crumbs into quart-size mason jars. You’ll want to use a Wide Mouth Funnel to keep things mess-free! Place the lids on top and label them. They will keep for a year if you properly store them. You can also store them in plastic food-safe containers too!
* This post contains affiliate links. If you make a purchase, we may or may not receive a small commission which helps to support this site. Thank you!
That’s it! It’s really easy to make your own homemade bread crumbs and it’s a great way to use up all of that stale bread that you would normally pitch out. I just use large plastic freezer bags to hold it all until I have enough to process into bread crumbs.

A food dehydrator has been on my wish list for years. So jealous of your flea market score! One of these days, I hope to get lucky, too. I’d love to be able to have a stash of homemade dry bread crumbs.
I didn’t spend $2 but this Ronco is the same dehydrator I have had since the 80s when I lived in Ohio. It still works! Some day I’ll get a fancy one but I’ve made turkey jerky and dehydrated most everything. I dehydrate my bread on cookie sheets in the oven, but only when I find a good sale on gluten free bread (as in a dollar at the 99 cent store!) Ron Popeil would be proud.
I need a food dehydrator! This would be such a great use for our stale bread.
I like this idea. Cant believe you scored that dehydrator for only $2. What a great find. I find that packaged bread crumbs and croutons never taste quite as good as homemade, always seem to have an after taste to them.
Oh my gosh, I want that Ronco dehydrator! Say what you will about those old commercials, every Ronco thing we had always worked! I love homemade bread crumbs!
I LOVE the Ronco products! That food dehydrator is like 15 years old and works perfectly! I use it for all kinds of different things. Best $2.00 at a Flea Market that I ever spent! Matter of fact, if I see another one, I will get it and keep it as a spare!
I would love to learn hoe to make some bread
this looks good never had seasoning bread before
I hadnt thought of using the food dehydrator! I also got mine at a yard sale, and use it for drying tomatoes , strawberries, and doing jerky. Bread crumbs never occurred to me, but it does make perfect sense. I dont know if we have the room in the freezer for a years worth of bread scraps, but it would certainly be worth it to get day old and do this. I also like the seasonings you use!
I like this idea but I don’t have a Food Dehydrator. I’m wondering if just putting the bread in a low temp oven overnight would work OK.
It would Sarah! That’s how I used to do it until I got my food dehydrator. I bought baking wire racks (the kind you cool your hot baked goods on) and used to lay those directly on my oven rack. Lay your bread slices, sliced bagels, sliced rolls, etc. on those (prevents pieces from falling down) and use your oven on the lowest setting. You just need to make sure that your bread is fully dry and crunchy!
II wish I could find a dehydrator for so little money at a flea market or garage sale. I usually dry out my bread in the oven. I also do not make the huge quantities that you fix.